AudioTheory Piano Keys – User Guide
Getting Started
Input
Playback
Scale Presets
Scale Library
Scale Inspector
Real-Time Scale Highlighting
The Scale Wheel
Piano Chords
Piano Chord Library
Application View
Ear Training Exercises
Ear Training – Higher or Lower
Ear Training – Note Match
Ear Training – Chord Match
Settings
Settings – Save and Load Presets
Settings – Note Names
Settings – Changing the Application Colours
Audio Latency – ASIO and DSP
Audio Latency – Mac/Linux DSP Settings
Audio Latency – Windows & the ASIO4ALL Driver
Getting Started
You can launch AudioTheory Piano Keys from the AudioTheory Piano Keys.exe executable file (Windows) or AudioTheory Piano Keys.app file (Mac OS). This loads up the main interface from where you can access the features detailed in this guide.
 Input
Input
The on-screen piano accepts input from any of the following sources:
MIDI – AudioTheory Piano Keys works best when you connect a MIDI device. This could either be an electric piano/ keyboard or MIDI controller. With this connected you will receive highlighting and audio feedback in real time when playing.
You may find that the octave on your device doesn't match that of the application, and the highlighting is shifted to a different position on the on-screen piano. This may be fixed by changing the octave the MIDI device itself, but it's also possible to offset the input value in the application settings.
Mouse – you can highlight/ play any key by clicking on it directly.
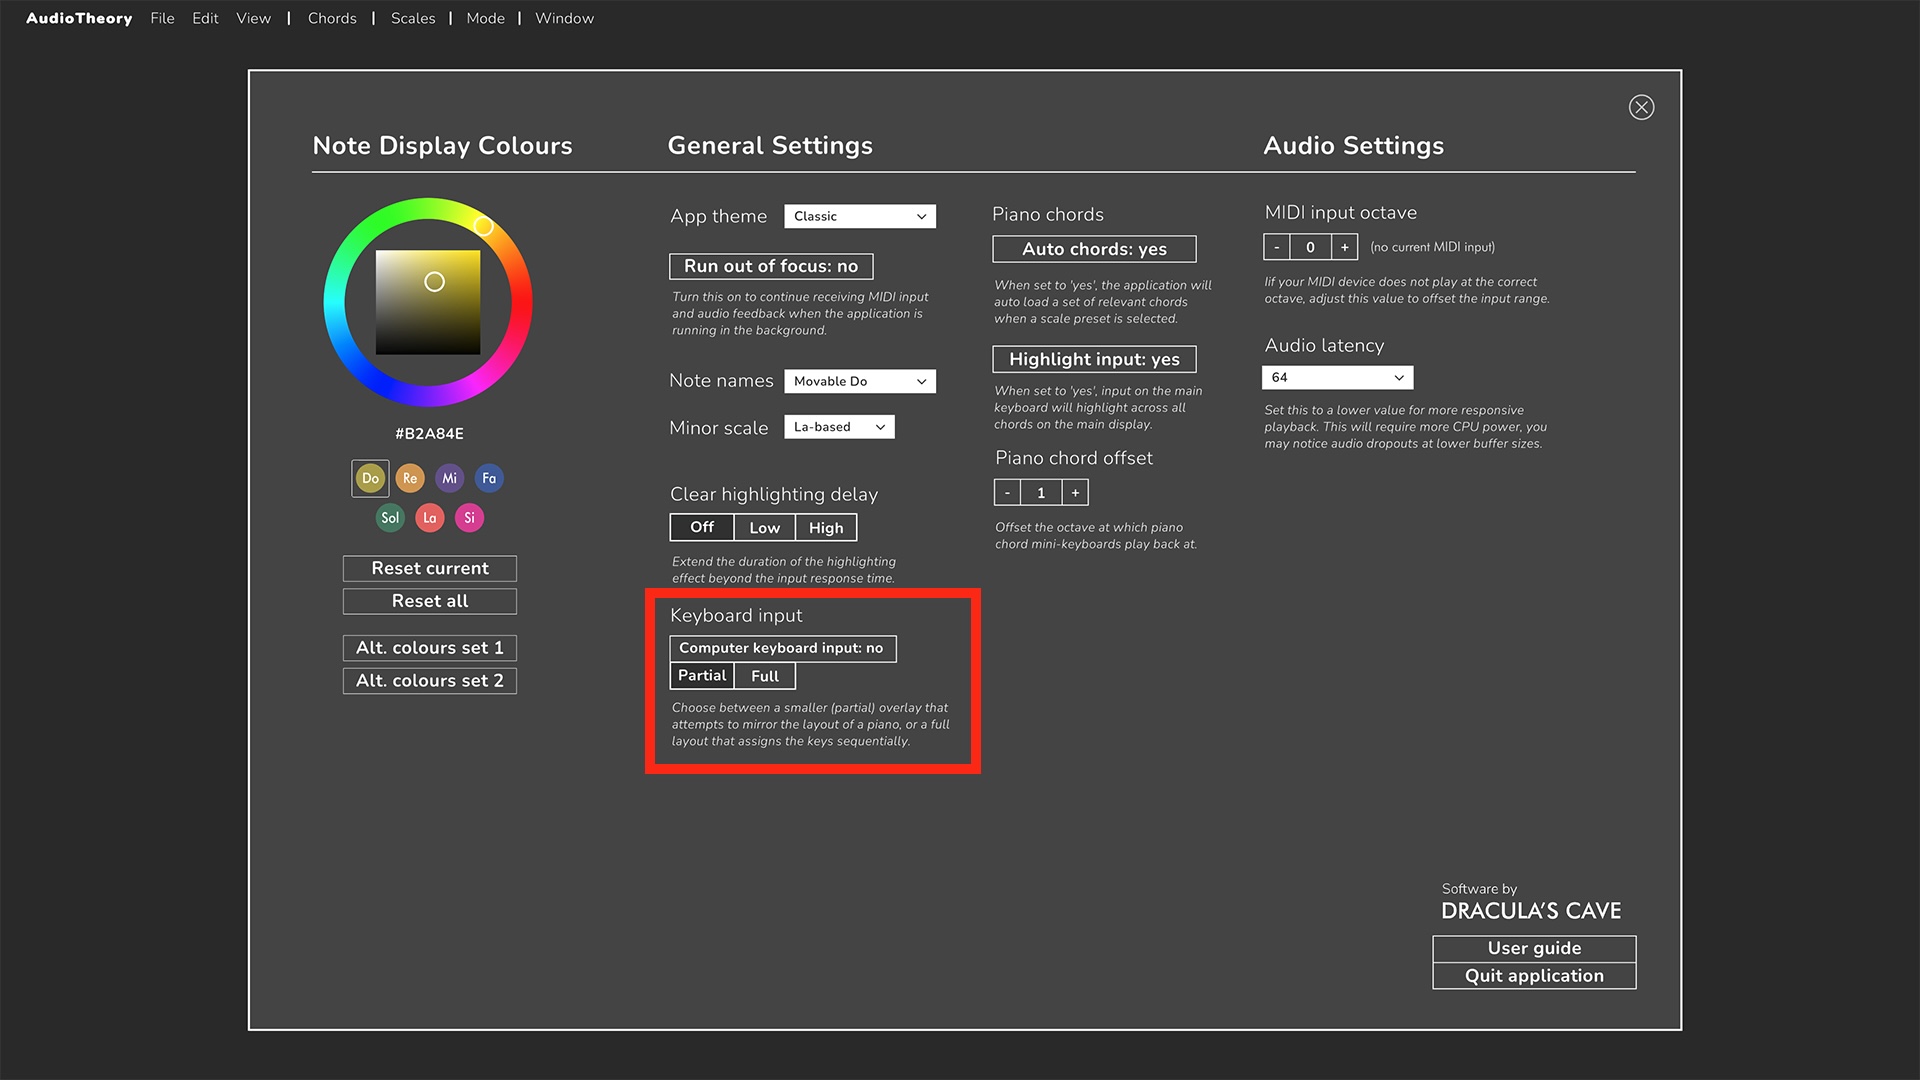 Keyboard – there are options within the application settings to use QWERTY input from your computer keyboard to play the notes on the on-screen piano.
There are two QWERTY keyboard overlay types that you can choose between labeled ‘partial’ and ‘full’. The partial keyboard overlay covers a single octave and is split across two rows of the keyboard. In 'full' mode, all the piano keys are sequentially mapped across the keyboard.
Keyboard – there are options within the application settings to use QWERTY input from your computer keyboard to play the notes on the on-screen piano.
There are two QWERTY keyboard overlay types that you can choose between labeled ‘partial’ and ‘full’. The partial keyboard overlay covers a single octave and is split across two rows of the keyboard. In 'full' mode, all the piano keys are sequentially mapped across the keyboard.
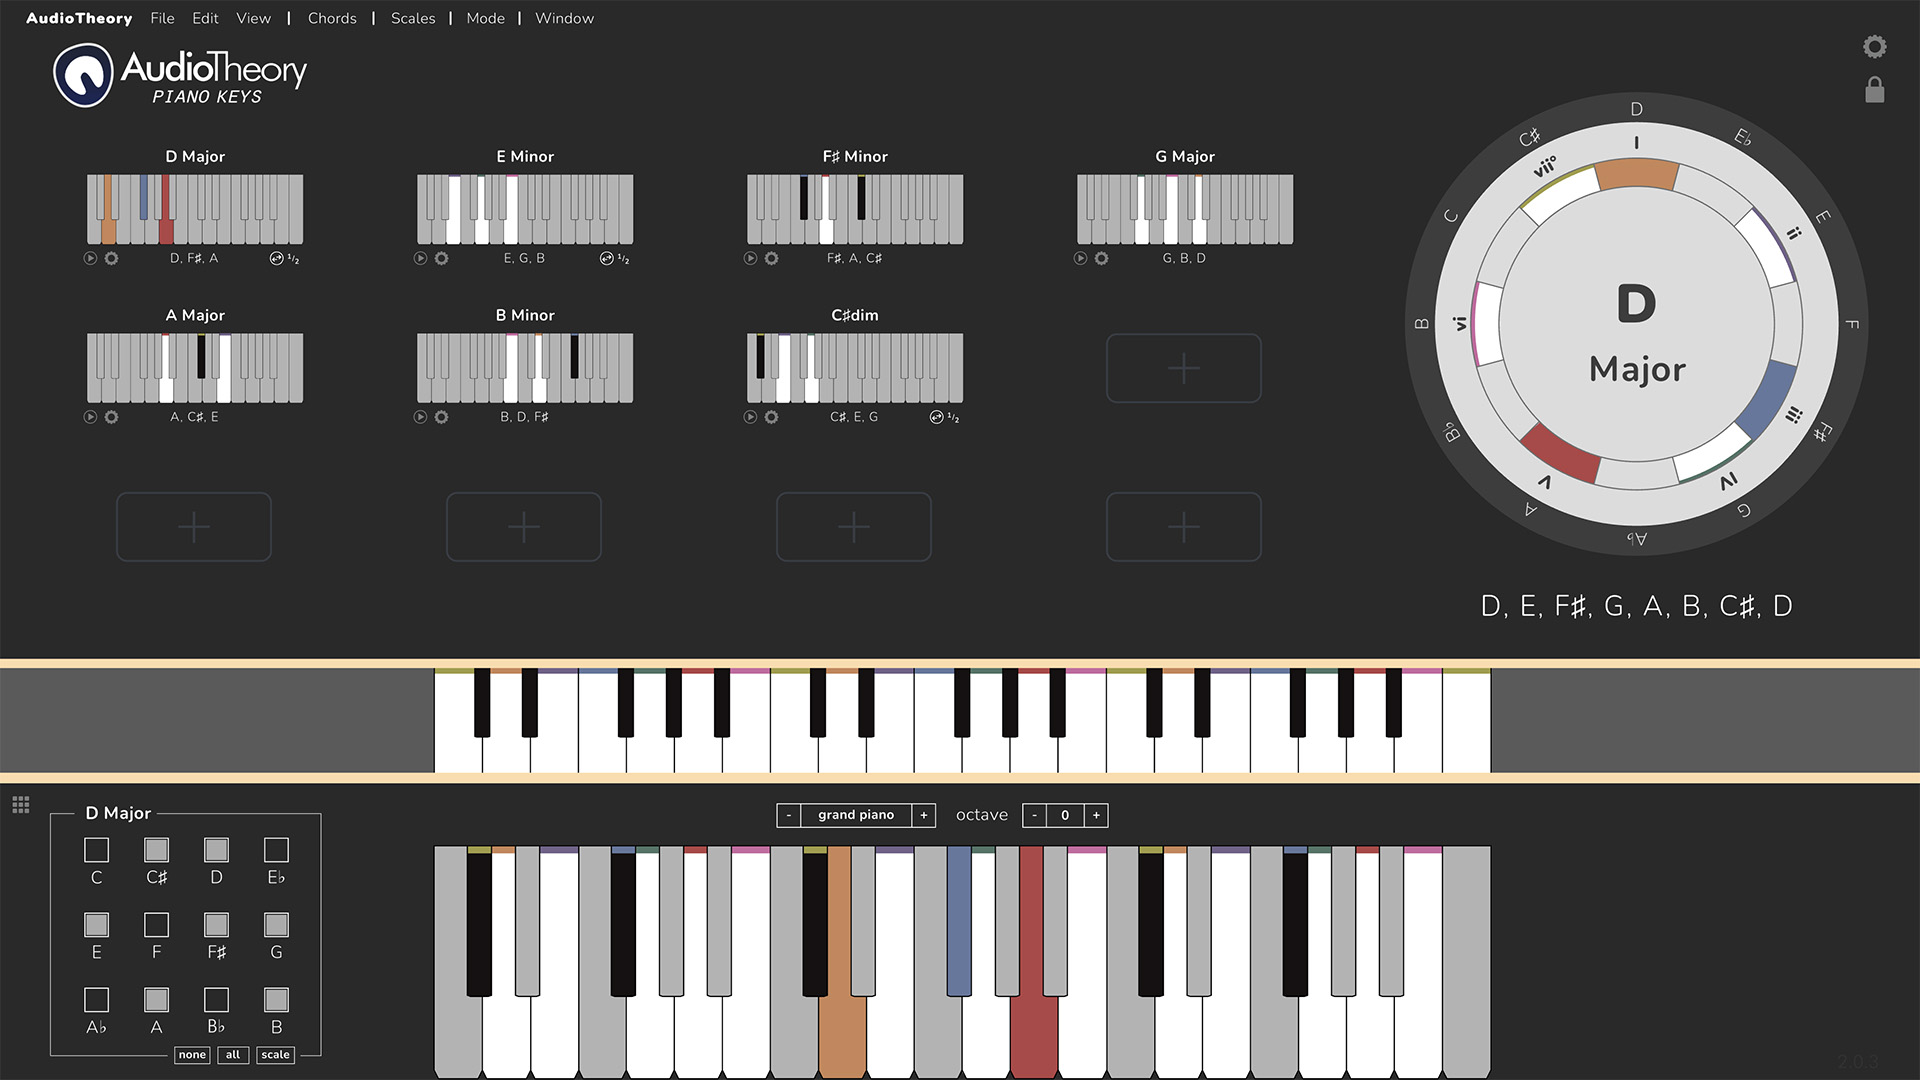
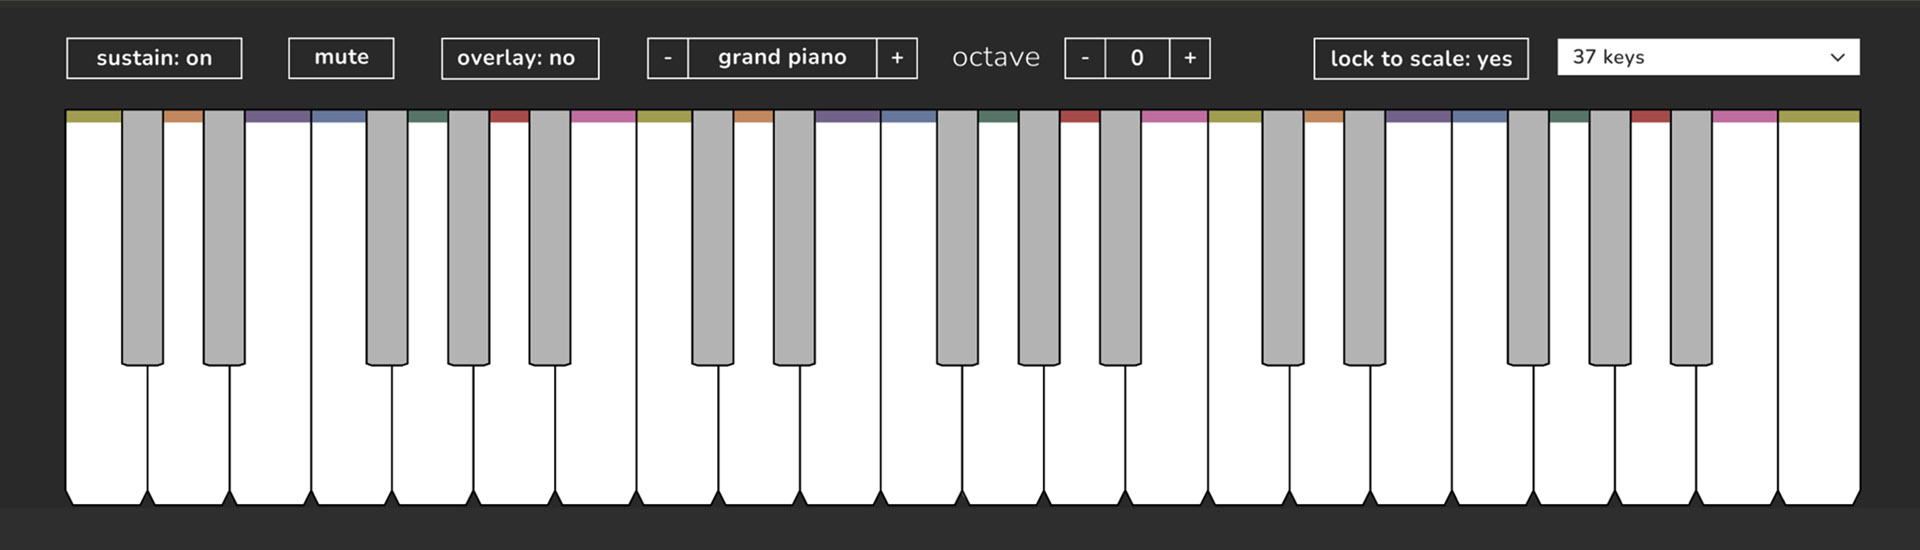 There are additional options to customise playback that accompany the on-screen piano when the application is in unlocked mode. This adds in buttons to display or hide the keyboard note overlay as well as a 'lock to scale' feature where only notes selected in the scale will give audio feedback.
There is an octave selector that controls the playback (output) octave. It can be configured independently from the MIDI (input) octave selector in the settings, so you can control how the application receives audio in and how it plays it back separately.
Playback
As you play notes on the keyboard you will receive visual and audio highlighting feedback as defined by your settings. This will display across both the on-screen piano and all loaded diagrams, giving you an overview of how what you're playing fits relative to scales and chords.
If you have any issues with MIDI input, there is an indicator in the settings which details exactly what input the application is receiving. This can be used to diagnose any issues you may encounter (e.g. if no notes were highlighting this could be used to asses if the input octave was out of range, or if the device was not properly connected to the computer).
 Scale Presets
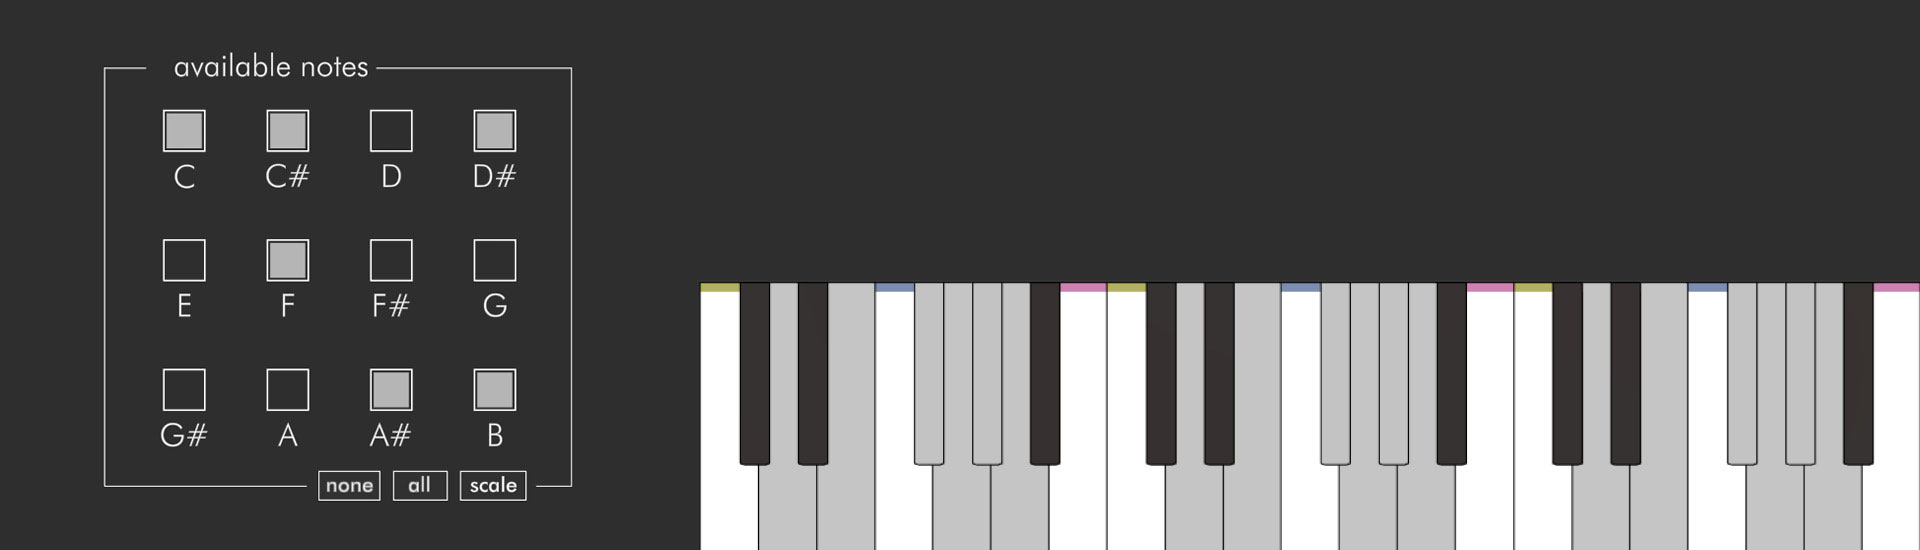
The note boxes in the bottom left of the screen can be used to exclude specific notes from the keyboard, as well as the chord and wheel diagrams. The 'scale' button provides preset options for using a standard piano scale.
 When a scale preset has been selected, the note highlighting updates to be context dependant. For example, if C♯/ D♭ is to be presented as C♯ in the selected scale the highlight colour will be yellow (the colour used for C). But when it's to be displayed as D♭ it will highlight in orange (the colour for D).
There are options to customise this behaviour within the application settings. The default assumptions for sharps and flats can be changed to consistently use the desired accidental, and the rules for note highlighting can be changed too. Whilst the default behaviour is for the black keys to automatically match the natural notes (so C♯ uses the colour for C, D♭ uses the colour for D), it's possible to override this behaviour and set independent colours for the black keys instead.
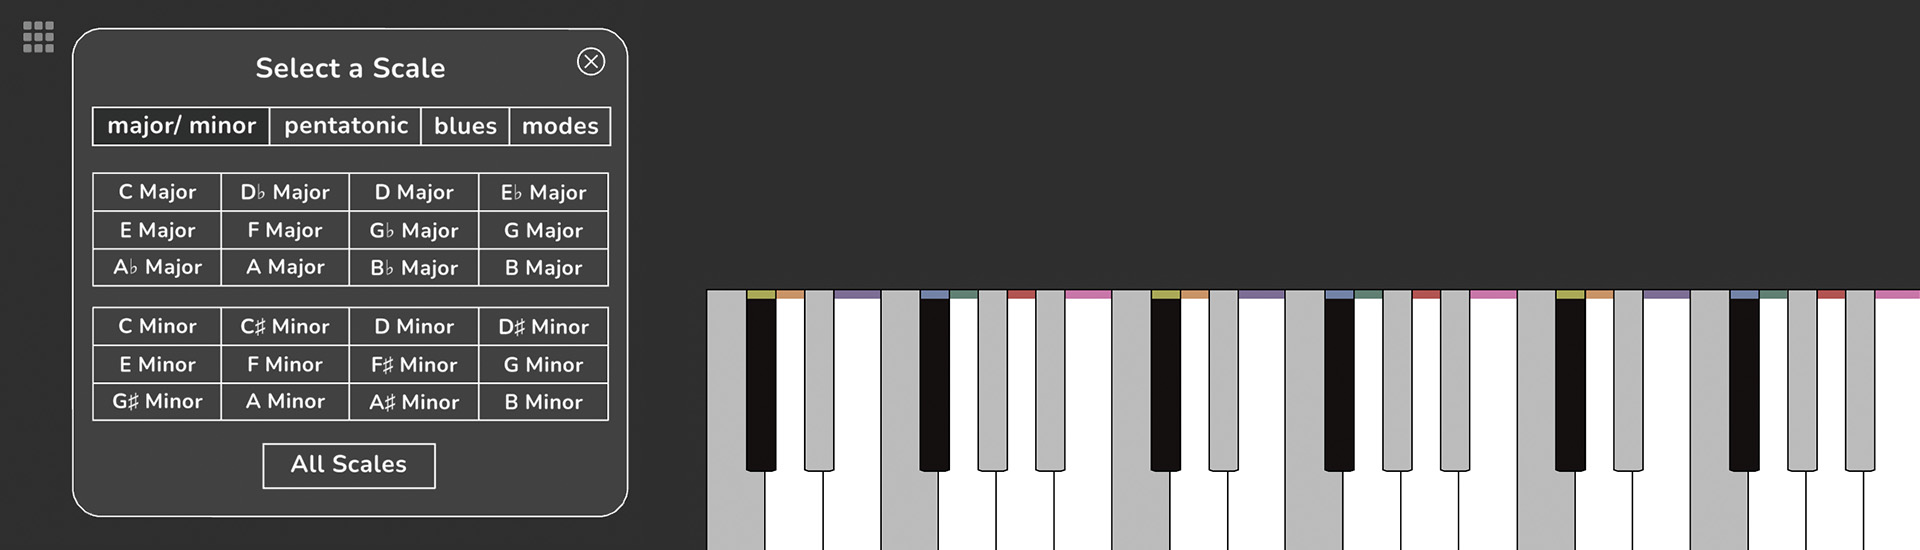
 The 'all scales' button provides a quick link to the full scale library (also accessible from the nav bar). Here you can view sets of scale diagrams side-by-side and choose one to load.
Scale Library
The 'all scales' button provides a quick link to the full scale library (also accessible from the nav bar). Here you can view sets of scale diagrams side-by-side and choose one to load.
Scale Library
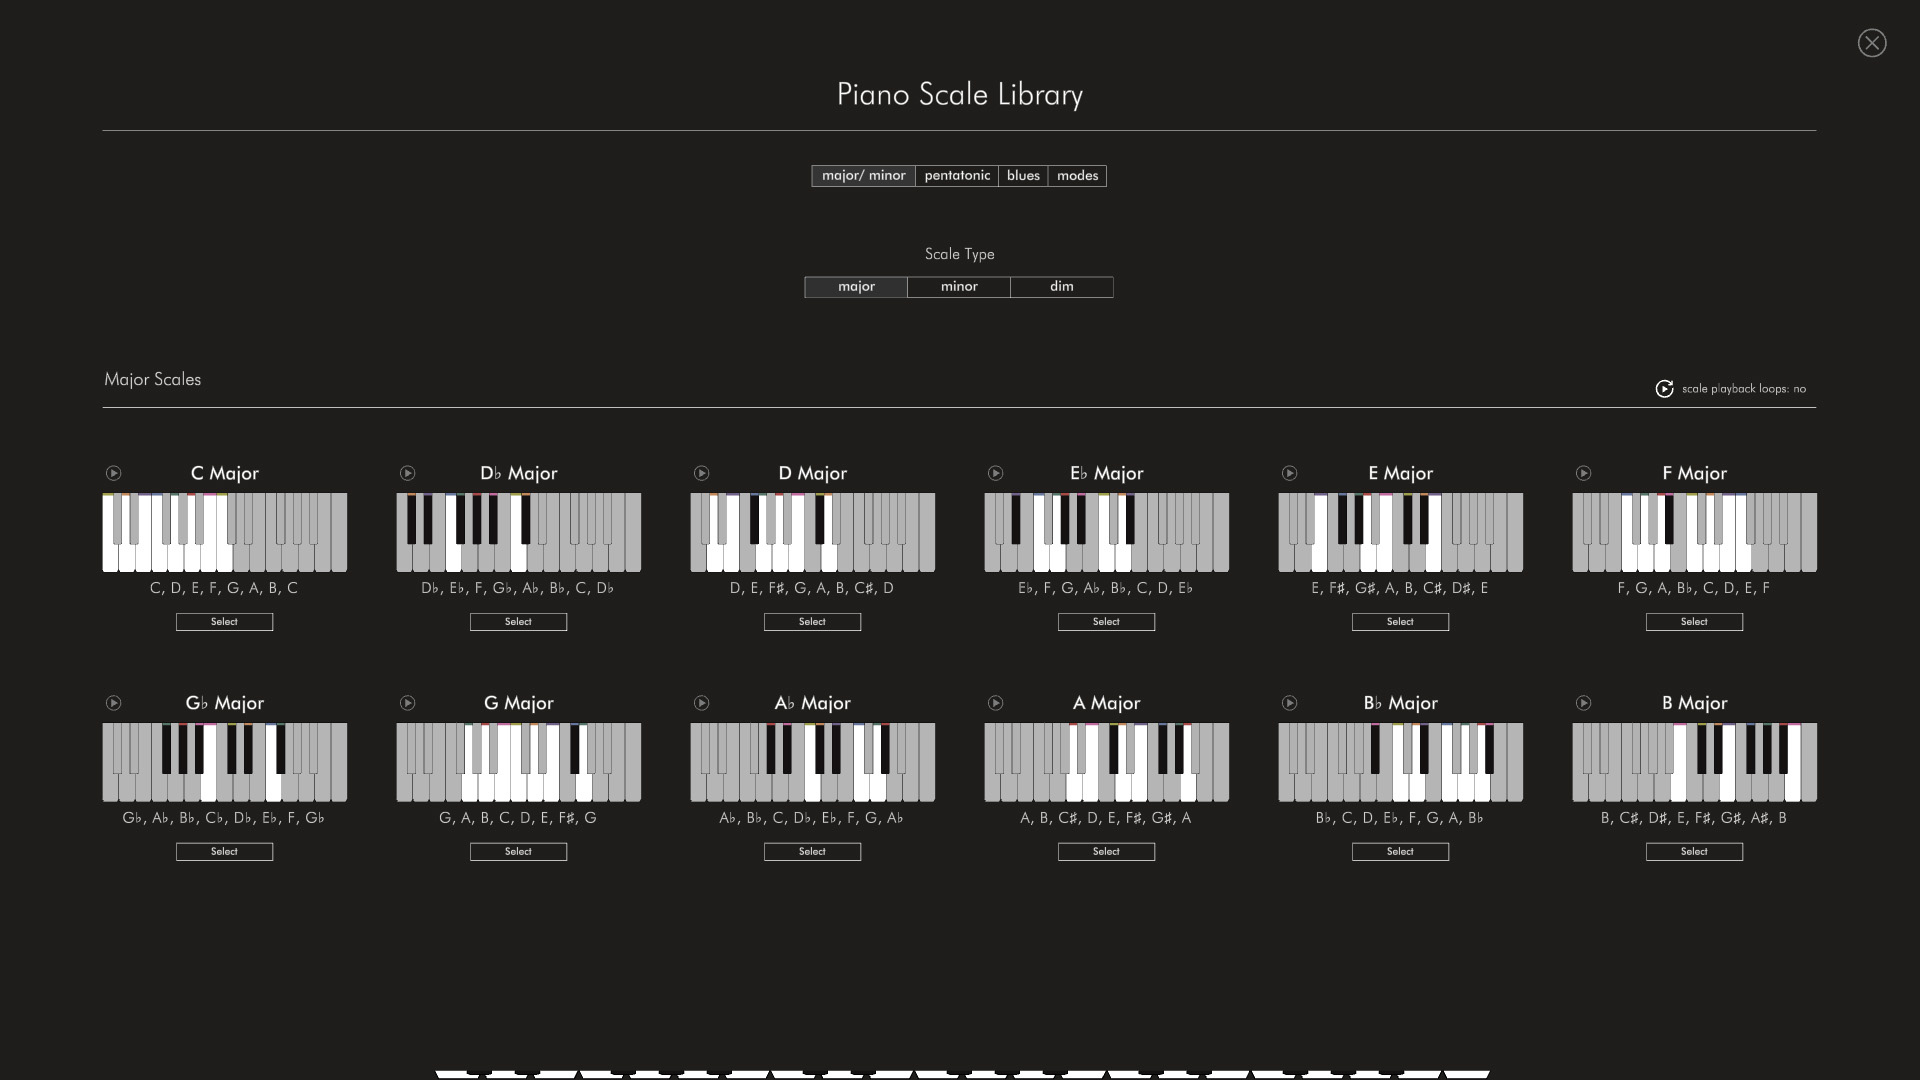 The scale library is where you can view, play-back, and find out more information about different scales. Each scale has it's own play button, with options on the right-hand side of the screne to configure playback settings.
Scale Inspector
The scale library is where you can view, play-back, and find out more information about different scales. Each scale has it's own play button, with options on the right-hand side of the screne to configure playback settings.
Scale Inspector
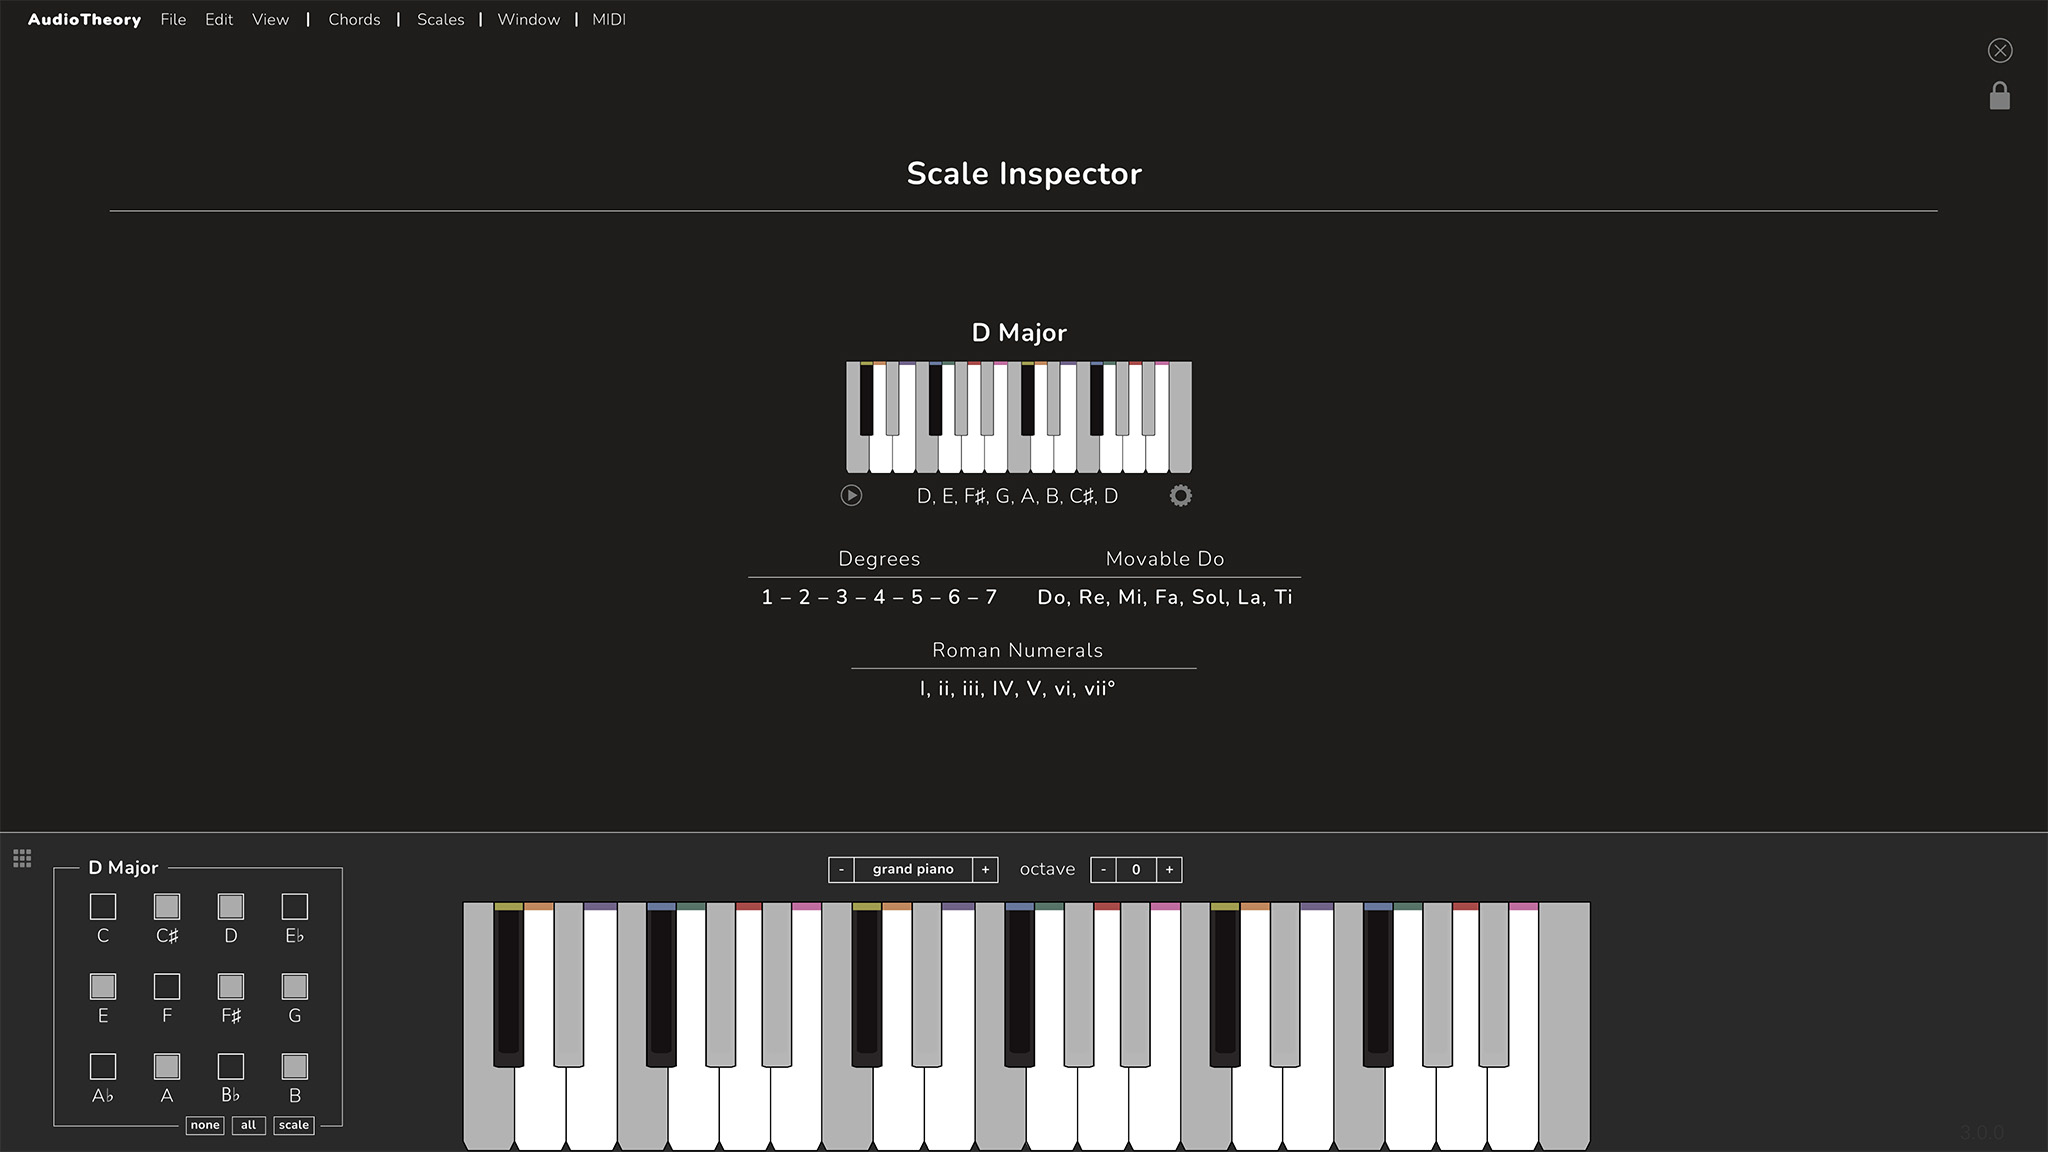 The info 'i' icon next to each scale here opens up the scale inspector. This gives a dedicated view for that specific scale where you can see a larger version of the scale diagram, as well as information about the scale intervals and movable do.
The scale itself can be changed from within the scale inspector too. Press the 'edit' cog to show root note and scale type dropdown selectors.
Real-Time Scale Highlighting
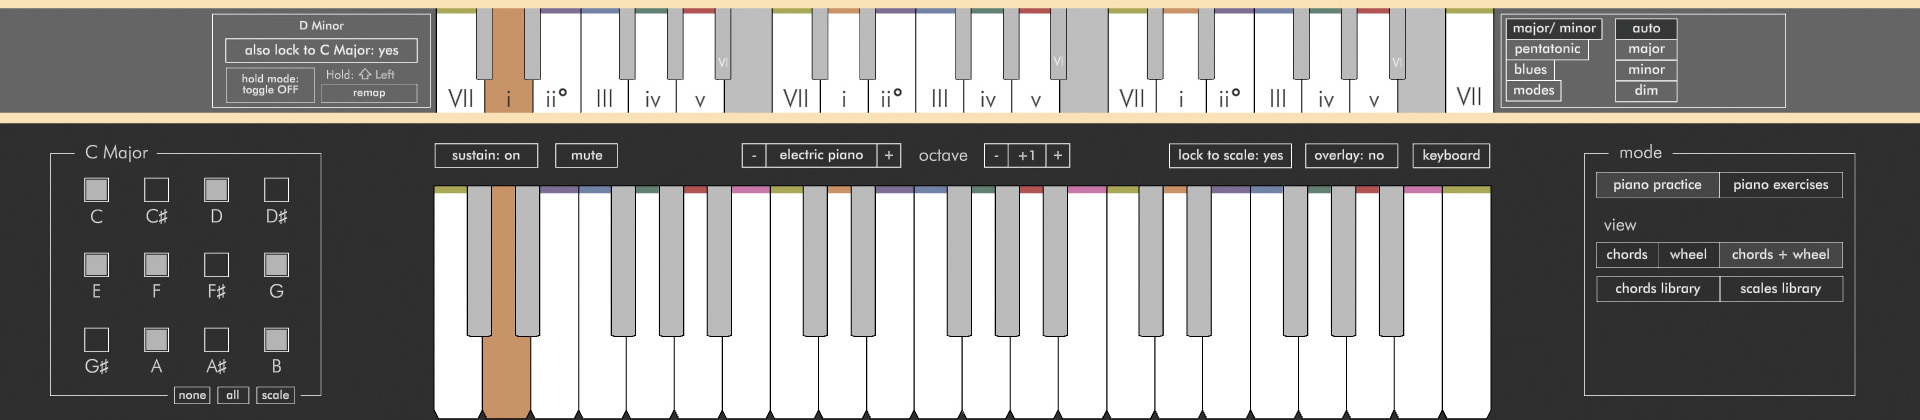 This is the second row of piano keys that sits just above the on-screen piano. It is one of the application's more advanced features, but once understood it is a very powerful tool for quickly understanding how a note you play fits into two scales at the same time – perfect for improvising.
Scale highlighting is most useful when you are using a scale preset. This is because (as long as 'auto' mode is set on the right hand side) the application will automatically display major or minor scales relevant to the context of the main scale.
The above screenshot illustrates how this works in practice. Here the main scale preset loaded is C Major and the 2nd note in this scale, D, is being played. The 2nd position of a Major scale is associated with a minor chord, which here would be D minor (D, F, A). Therefore it's the minor scale that is relevant to this context.
So when pressing the D note we are able to see the relevant scale for this note, and you will notice that it is highlighted against the C Major scale too (here this means that B♭ is marked up as position VI, but it is greyed out as B♭ is not part of C Major). As such, the notes we are viewing that are not greyed out show the D minor scale progression, but also filtered to our main song key (C Major).
The settings to the left and right of the scale highlighting view offer additional customisations in regard to how this works. On the left you will see the name of the displaying scale and also an option to turn off the dual highlighting filter.
There is also a hold mode, which allows you to keep the 2nd scale displaying even when additional input is received. By default, AudioTheory Piano Keys has its own algorithm for identifying the desired root note when a large amount of input (chords/ multiple notes at once) is received. Typically this will be to display the scale for the lowest input note received, which in most cases will be desirable. For example, if the D Minor chord is played this means that the D Minor scale will always show, regardless of the order (which may be milliseconds apart) between which input is registered for the three notes.
Hold mode gives additional manual control over this, allowing you to press a button on the keyboard and keep the current scale on screen for the duration of the press. By default the hold button is Left Shift, but there is also an option to remap it, and change the behaviour of this button to a toggle (rather than having the requirement for it to be continuously pressed down).
On the right hand side are options to configure the scale type used. As above, the 'auto' option is recommended for use with a scale preset as this will display the major or minor scale relevant to the context. However you can alternatively specify a different scale type (or subsections such pentatonic or blues) to use.
The Scale Wheel
The scale wheel is a new way to view a scale preset. The wheel will display in chromatic mode when no scale is loaded, but once you have a set a preset it will display over the wheel too.
The main use of the scale wheel is that it allows you to see how a scale operates as a set of fixed, relative positions. This is to say that the wheel displays as 12 evenly spaced indicators, where as the piano itself moves unevenly between white and black notes. As such, you have a diagram where you can easily observe how all scales of the same type (major/ minor etc.) use the same set of intervals. The scale wheel also consistently places the root note at the 12 o clock position on the wheel, again this allows the scale to be viewed primarily as a set of 'relative' notes, with the starting point and interval size not changing.
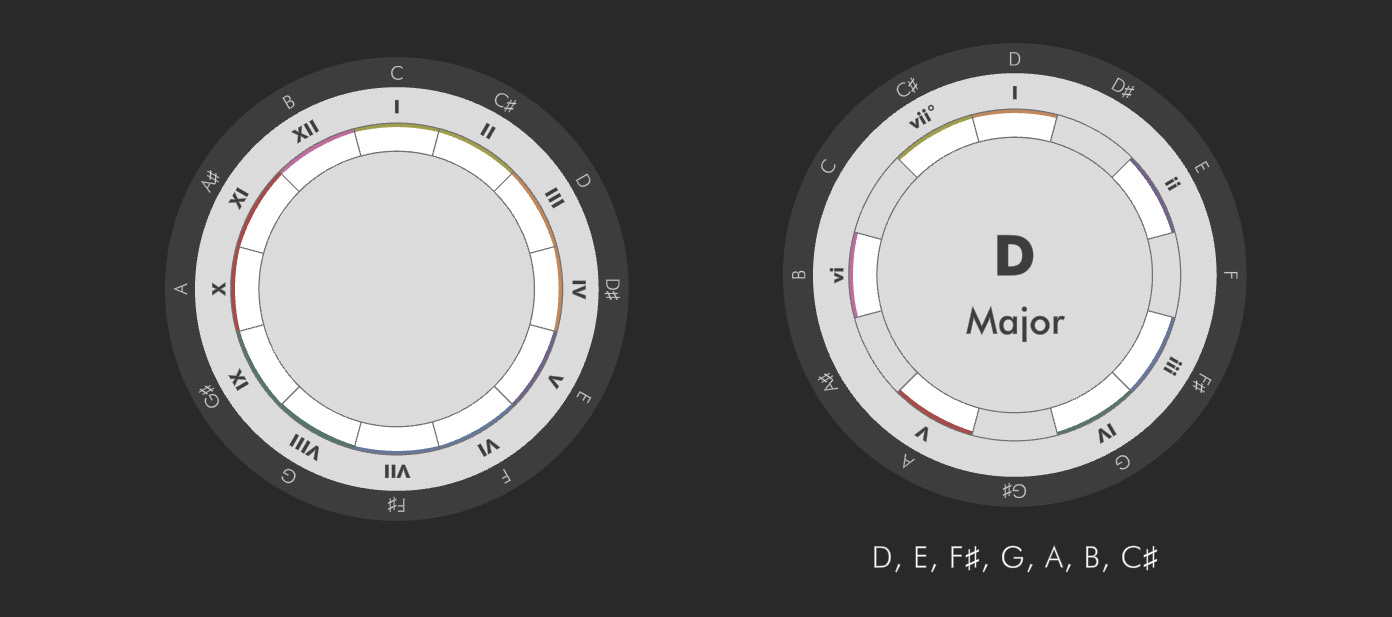 You can see here the difference between the two modes. When no scale is loaded the wheel displays with an empty center, however when the available notes match a scale preset, the details for this scale appear in the middle of the wheel and the notes in the scale are listed underneath too.
The scale wheel works best like this as you have a few extra features, but it can also be used with any custom subsection of notes that don't match a specific preset.
You can see here the difference between the two modes. When no scale is loaded the wheel displays with an empty center, however when the available notes match a scale preset, the details for this scale appear in the middle of the wheel and the notes in the scale are listed underneath too.
The scale wheel works best like this as you have a few extra features, but it can also be used with any custom subsection of notes that don't match a specific preset.
The advantage of using a scale preset is that the application knows which chords within that scale are major, minor or diminished, and indicates this across the relative positions using the following shorthand:
• Uppercase – note in scale plays as a major chord
• Lowercase – note in scale plays as a minor chord
• Lowercase° – note in scale plays as a diminished chord
Note that the application also includes melodic scales that don't imply functional harmony (e.g. jazz, blues etc.). In these cases, the roman numeral indicators are not shown as they are not applicable.
There are a couple more ways in which you can interact with the scale wheel. By clicking and dragging the outer wheel (the dark grey band with the note names) you can quickly swap the scale root note. Upon doing so, this will load the scale fully into the application so the note highlighting will adjust everywhere. You can also click on the scale type to quickly swap between the Major and Minor scales for the current root note.
Piano Chords
Piano chords are loaded into the main top left area of the screen. By default, when setting a scale preset that has a corresponding set of chords, these will be loaded too. This can be turned off in the settings if desired. There is space for up to 12 chords so additional chords can be added by pressing the '+' icon on any blank space. Alternatively, each piano chord has a mini-cog 'edit' icon under it. You can press this button to bring up the settings for that individual chord, which includes an option to swap it out.
 Each chord has a couple more options that sit just underneath it. The play button can be used to directly play back the chord. There is also a green tick which only shows when the chord is playing, this is useful for playing and verifying chord shapes using a MIDI device.
When hovering the mouse over a chord you will also see an arrow icon, this can be used to drag the chord around and quickly rearrange chords within your view.
The double-arrow icon in the bottom right can be used to cycle the chord up one note at a time. This lets you cycle through the different chord inversions, and transpose the chord up an octave.
The info 'i' icon in the bottom right opens the chord within the chord inspector. This gives a larger view of the chord diagram, as well as information about the chord intervals and chord type. As with the scale inspector, a dedicated edit button allows for the root note and chord type to be changed from within this view too. The chord inspector also includes movable do notes for the chord that update dynamically based on the applied scale preset, and movable do options configured within the application settings.
Piano Chord Library
When swapping out a piano chord you will be taken to the piano chord library, where you can select a new chord to load. In this view, chords are initially sorted by type and you can choose an option using the selector at the top and then view the relative chords for this type below.
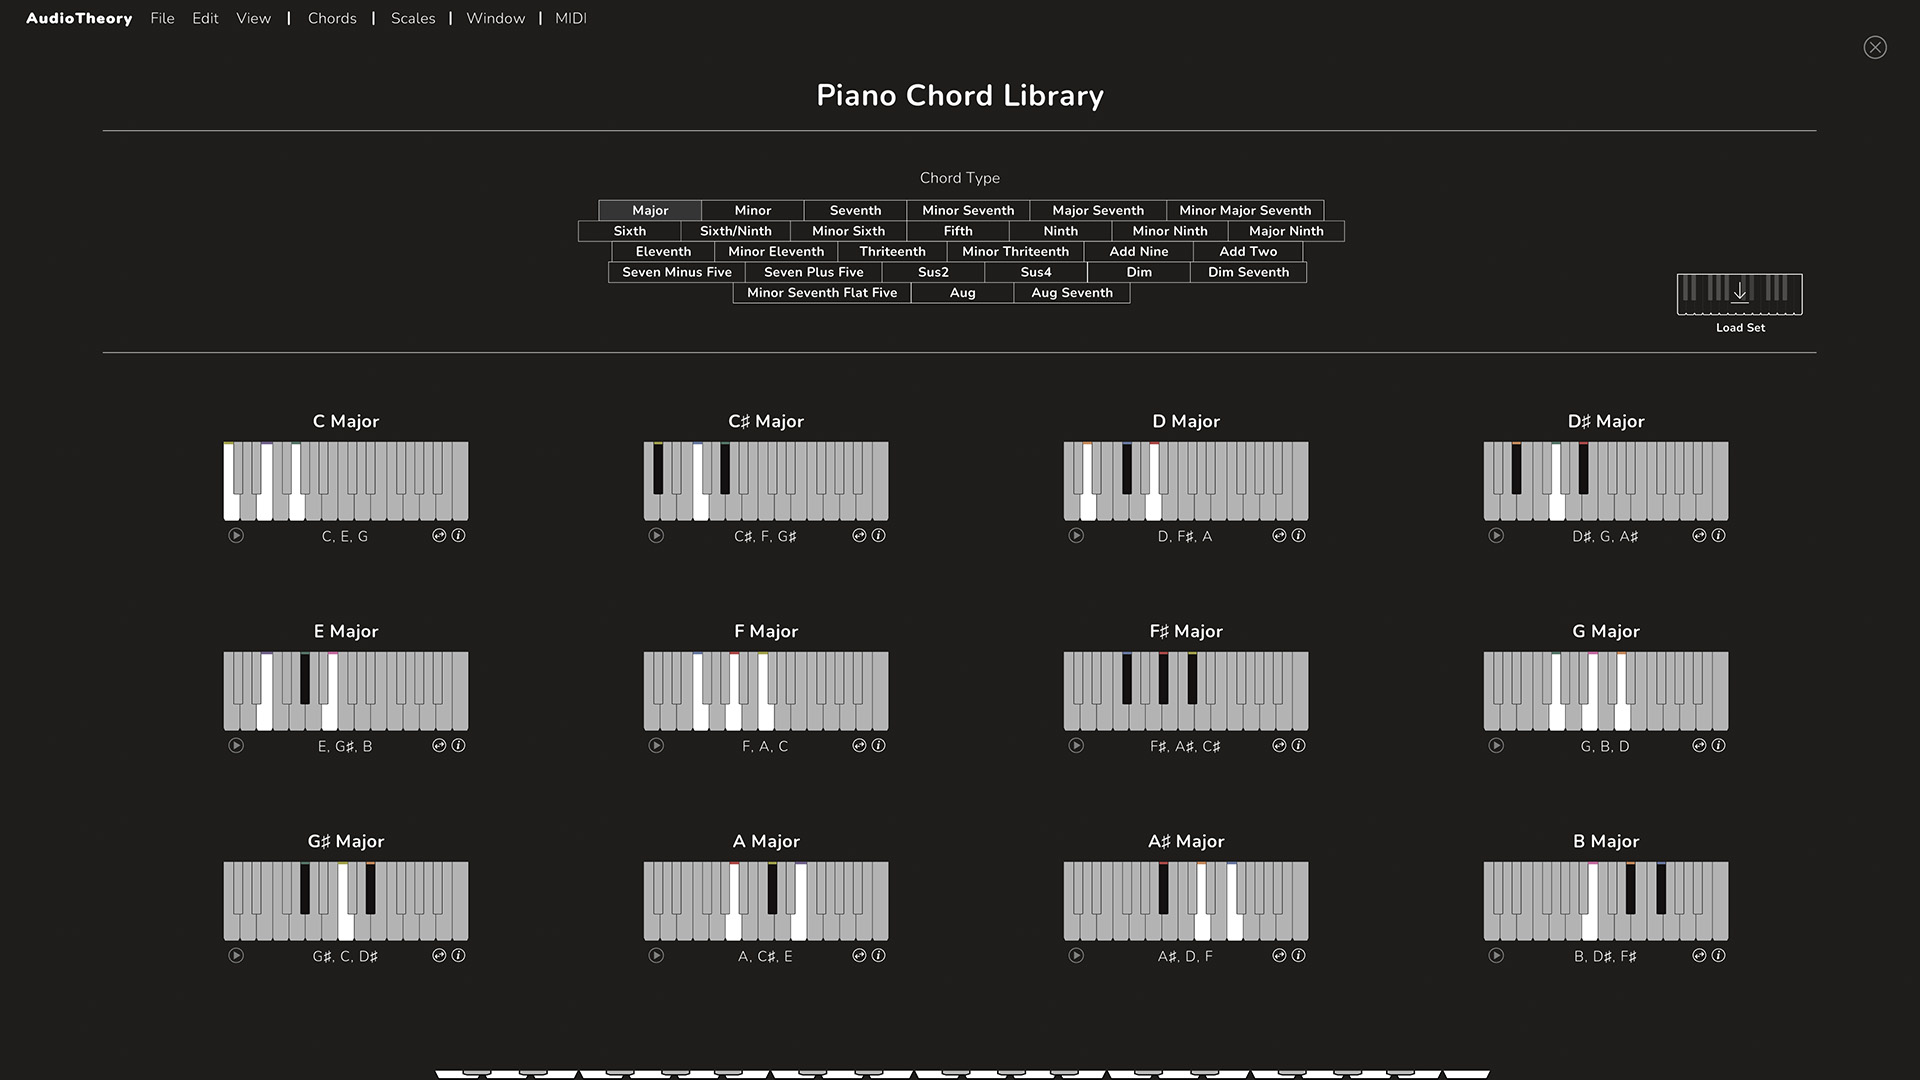 There is also a button in the top right that lets you load the full set into the main application view all at once.
Here too, each chord has a play button to hear what it sounds like, as well as an info 'i' icon to open up the chord inspector for that specific chord.
Application Window
 The Window option in the nav dropdown provides options for configuring the application view. Here you can adjust the presentaton of chords and the scale wheel within the main view, jump directly to the chord or scale inspector, or access the built-in ear training exercises.
Ear Training Exercises
The Window option in the nav dropdown provides options for configuring the application view. Here you can adjust the presentaton of chords and the scale wheel within the main view, jump directly to the chord or scale inspector, or access the built-in ear training exercises.
Ear Training Exercises
Found under the 'Window' dropdown in the nav.
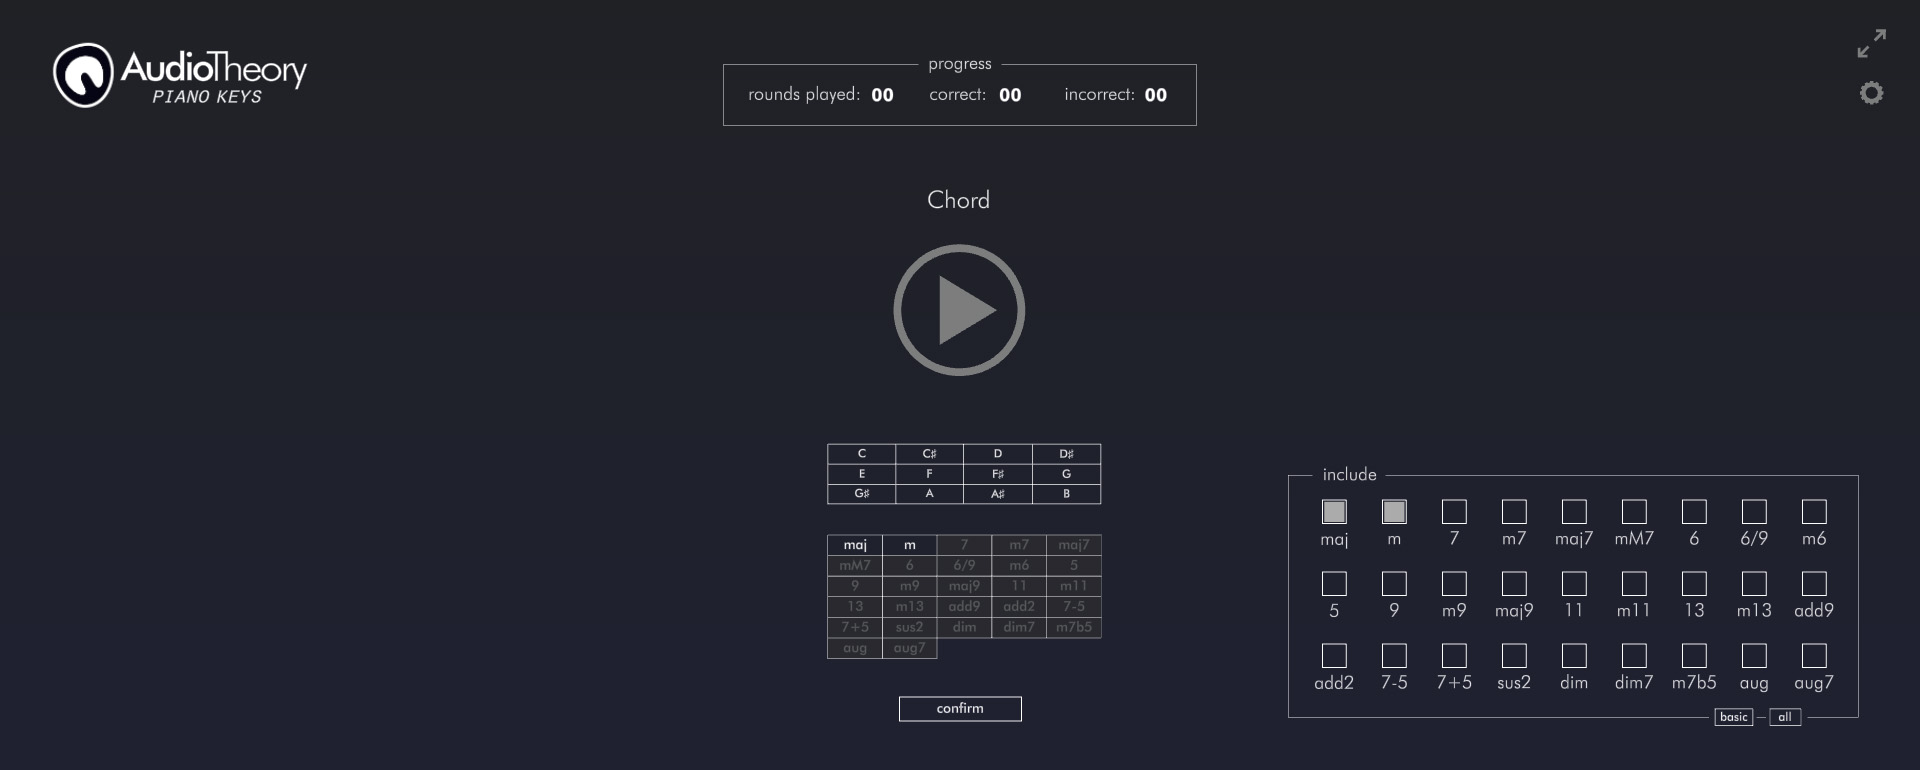
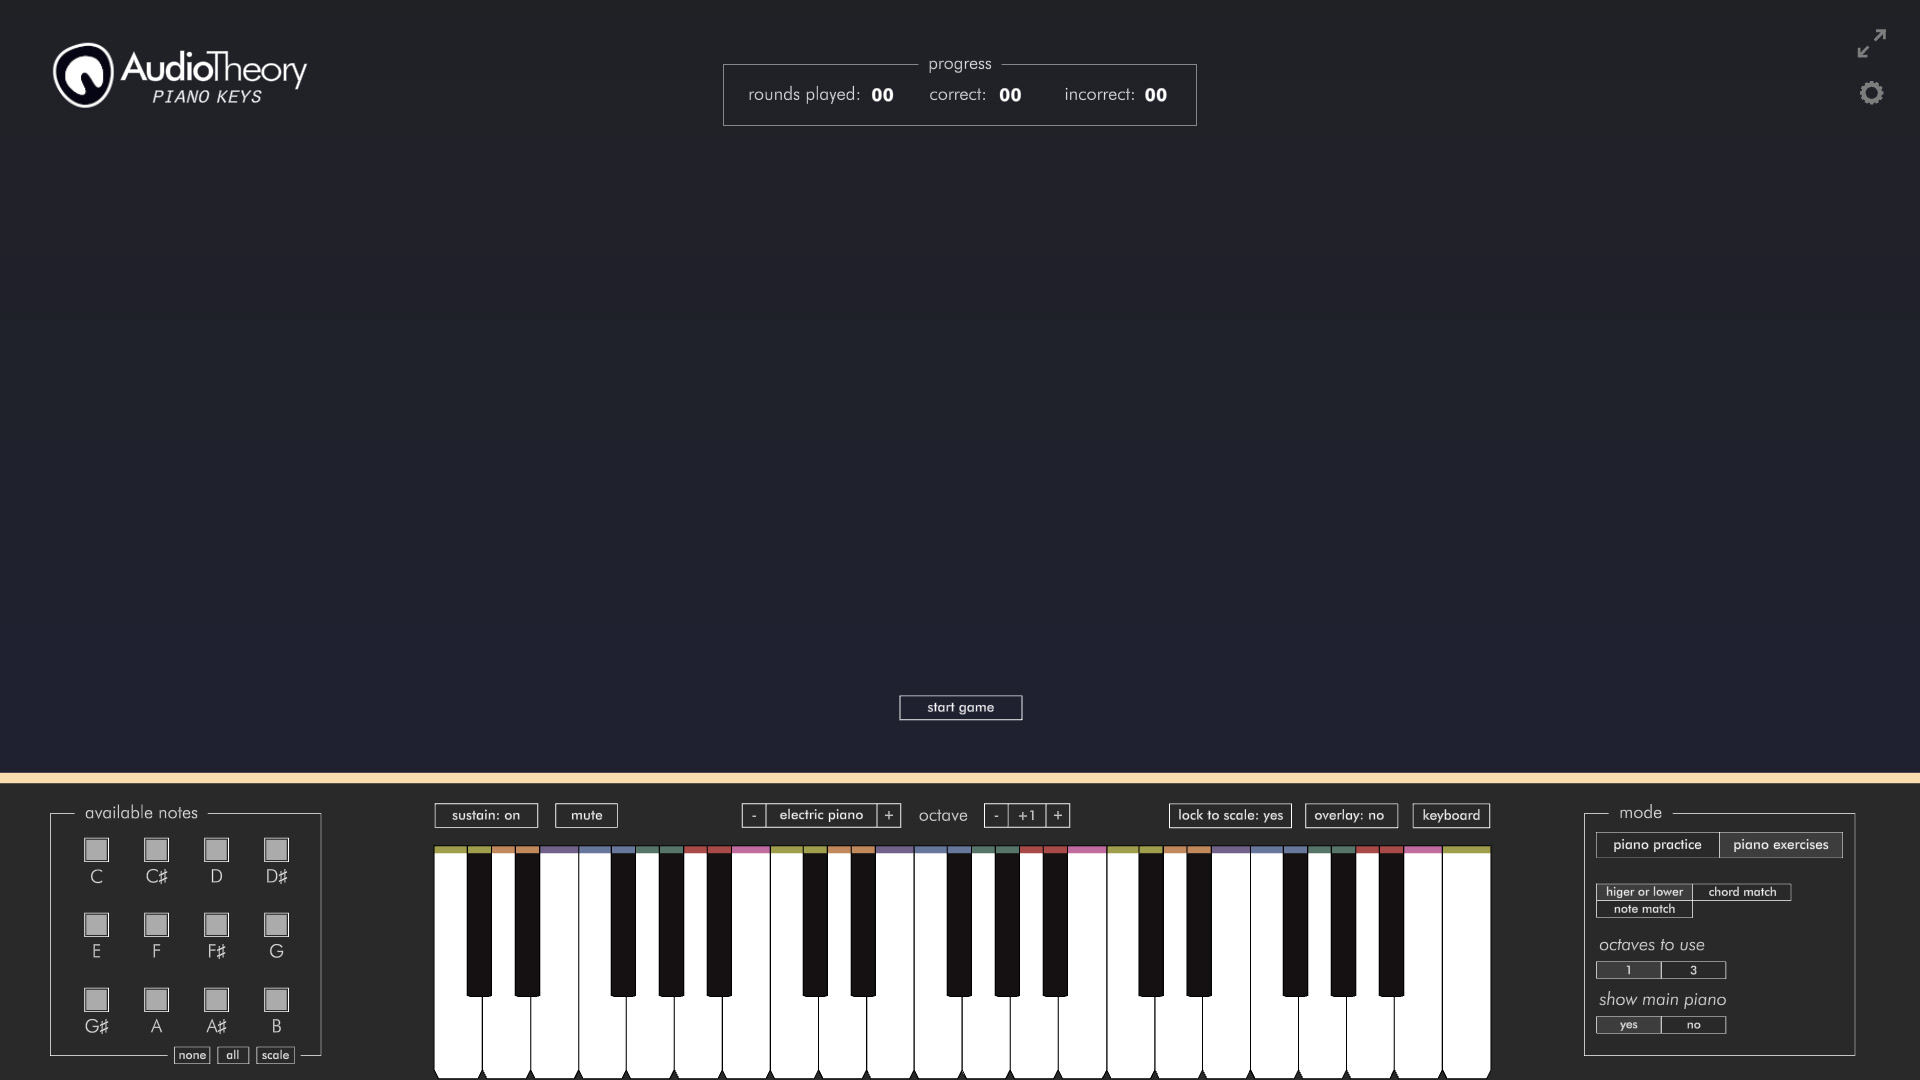 Initially when you select the ear training mode you'lll be prompted to start a game using the button. Ahead of this, you can adjust the game configuration using the options in the top-right. During the game, you can swap modes at any time. Any other changes to the settings (including changes to the current scale preset) will take affect from the next round.
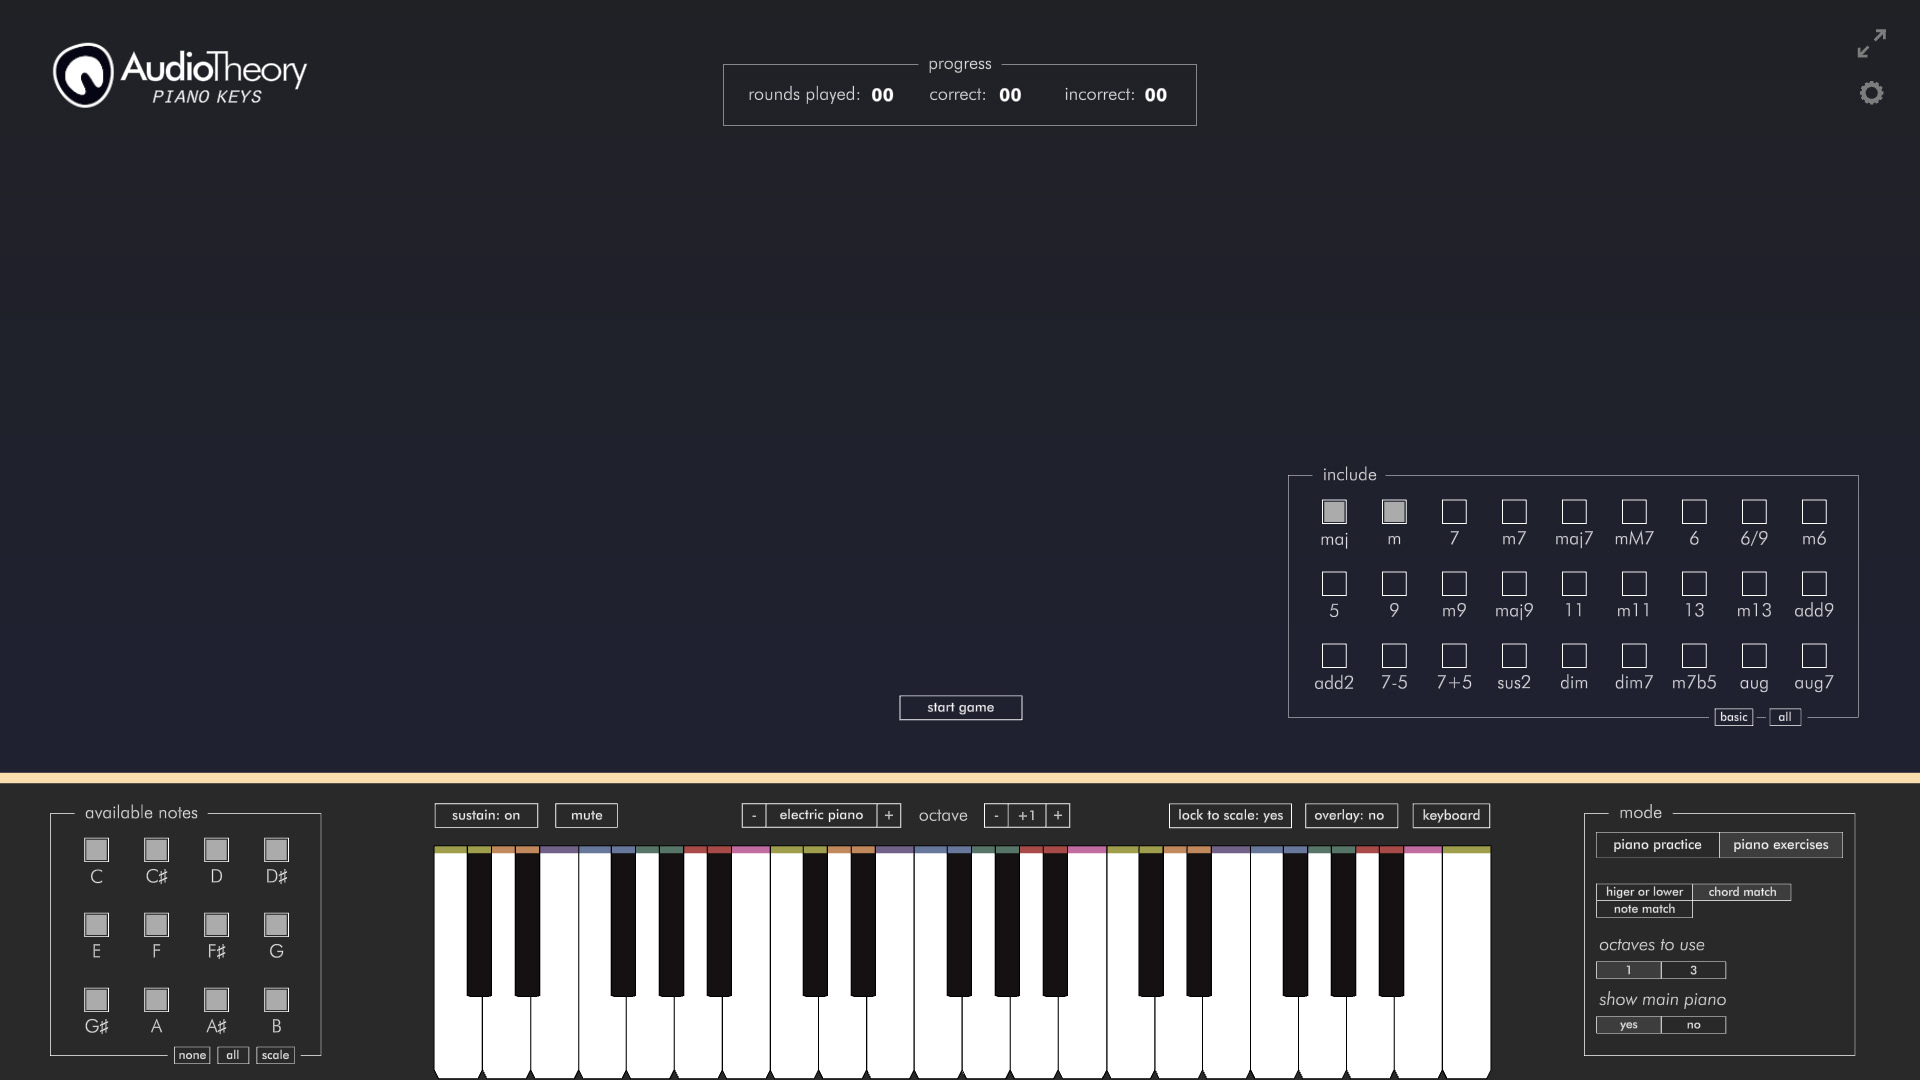 When the 'chord match' exercise is selected you will also see a chord type selector on the right hand size of the screen. This will let you choose which chord types will be presented at random for you to identify.
Ear Training – Higher or Lower
When the 'chord match' exercise is selected you will also see a chord type selector on the right hand size of the screen. This will let you choose which chord types will be presented at random for you to identify.
Ear Training – Higher or Lower
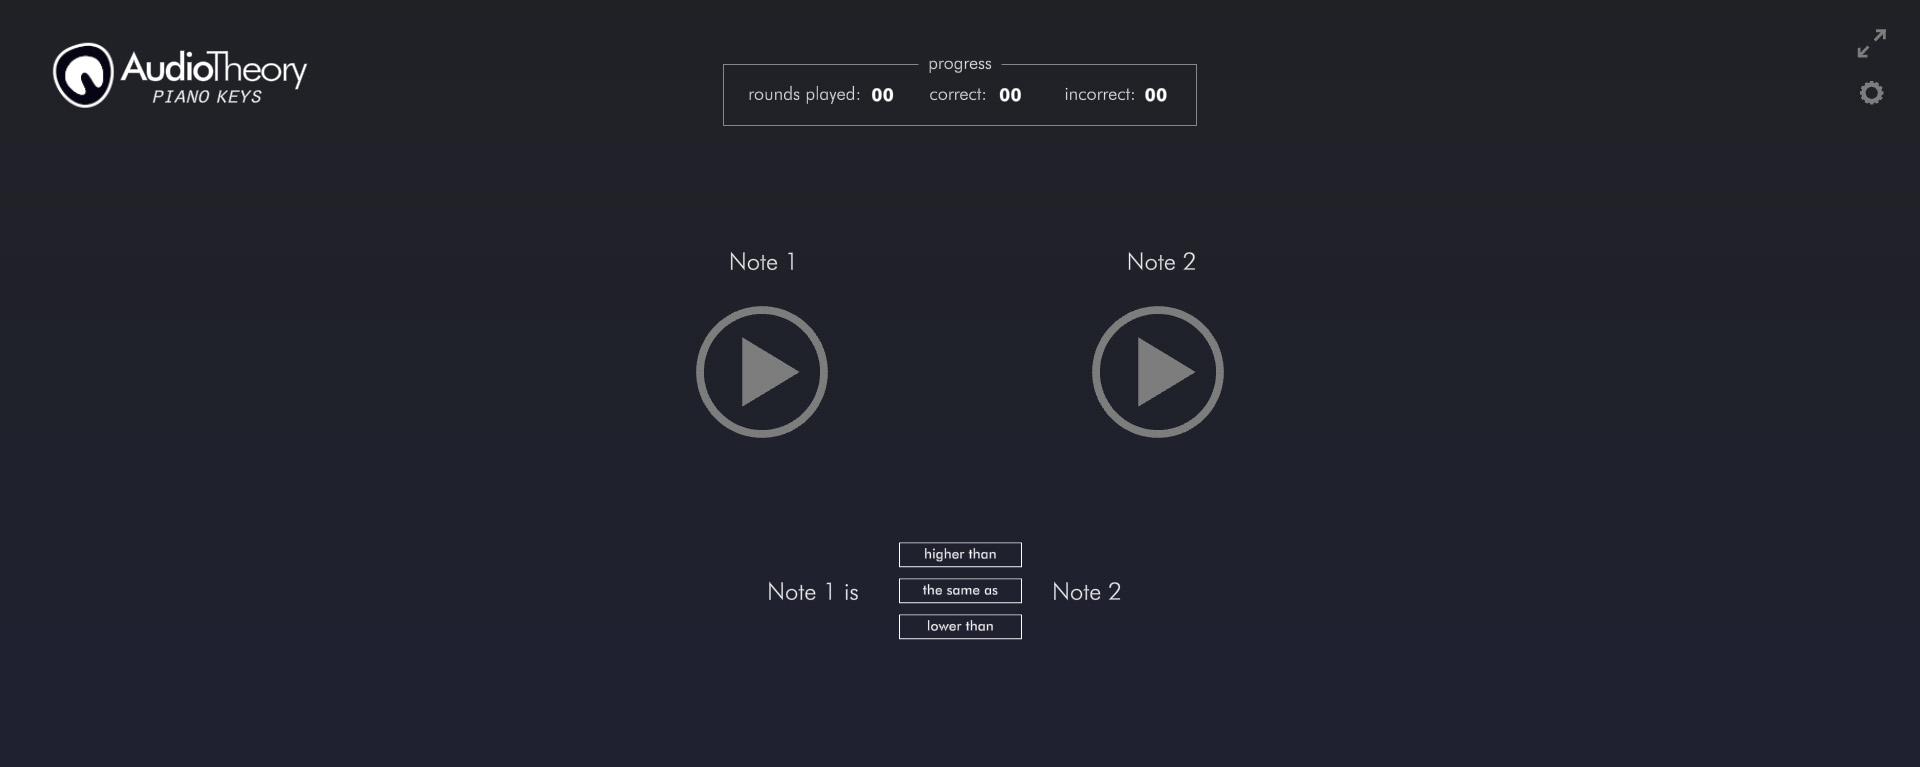 'Higher or Lower' is a good training exercise to start out with as it is the easiest and most straight forward. In this mode you are presented with two notes and must identify if the first is higher or lower (or the same) as the second. This game references the current scale preset, so you can play it with a subsection of the notes if desired. Note that with this game if the number of octaves is increased from 1 to 3 (set in the bottom right) this makes the game easier, as it results in a typically greater (more obvious) differentiation in pitch between the randomly selected notes.
Ear Training – Note Match
'Higher or Lower' is a good training exercise to start out with as it is the easiest and most straight forward. In this mode you are presented with two notes and must identify if the first is higher or lower (or the same) as the second. This game references the current scale preset, so you can play it with a subsection of the notes if desired. Note that with this game if the number of octaves is increased from 1 to 3 (set in the bottom right) this makes the game easier, as it results in a typically greater (more obvious) differentiation in pitch between the randomly selected notes.
Ear Training – Note Match
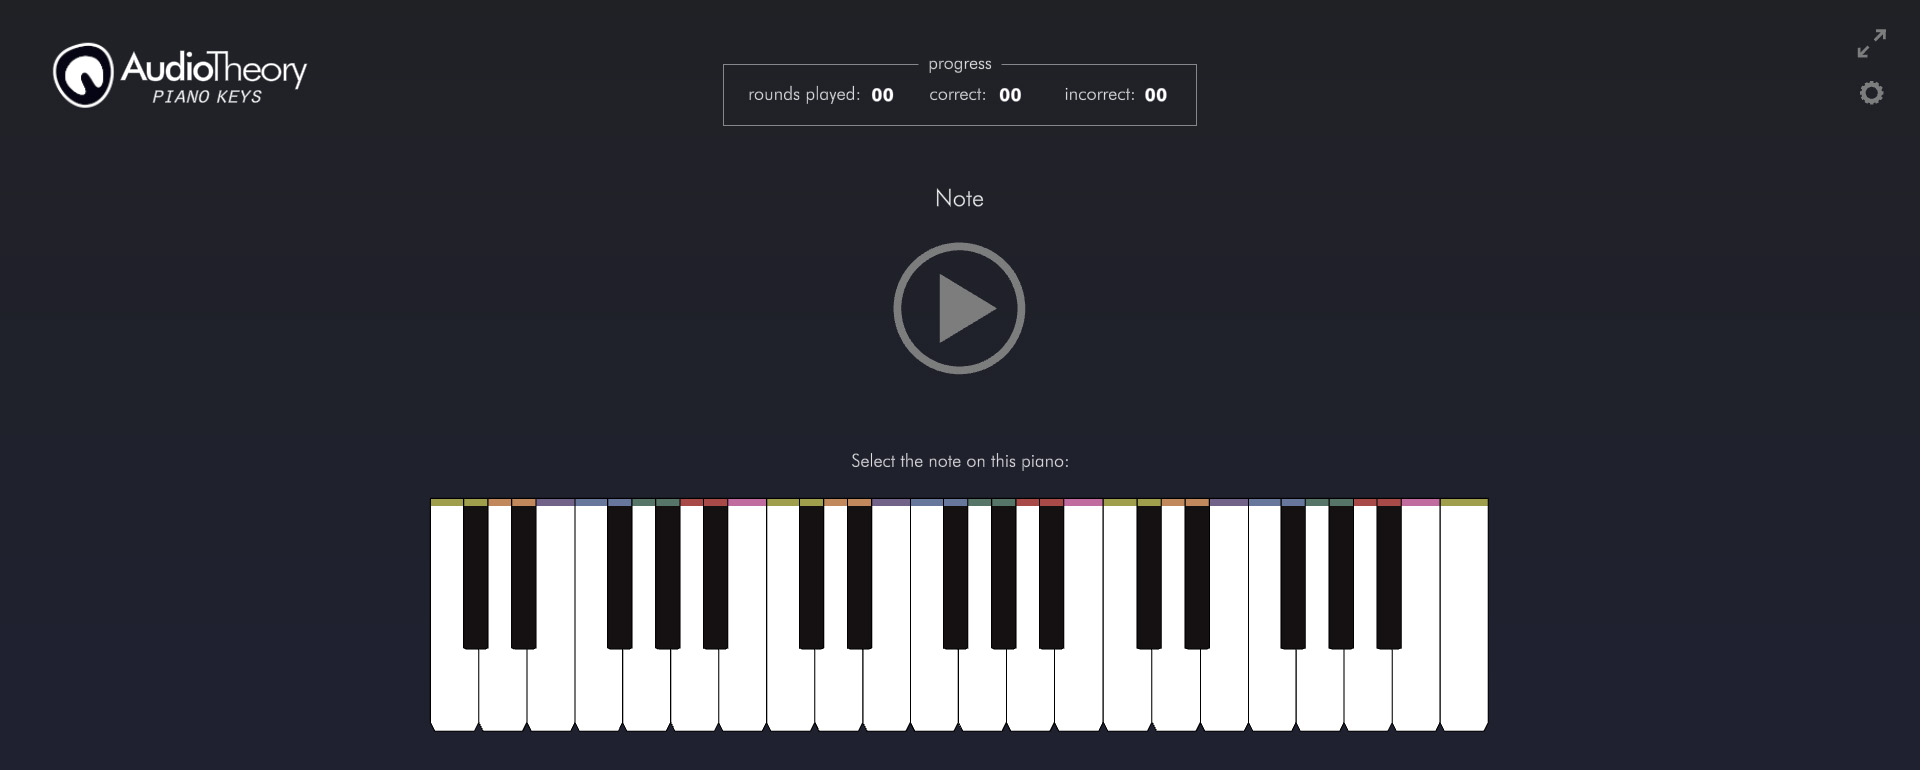 'Note Match' is in many ways a more advanced version of 'H'igher or Lower', but in this exercise you must identify the exact note match. This can be made easier by using a subsection of notes (for example the C Major scale). It can be made harder by swapping setting the number of octaves to use (found in the bottom right) from 1 to 3, as this means a much wider selection of notes are used.
A tip for this exercise is to make use of the main on-screen piano, you can press the notes here to match up the sound before selecting your answer.
Ear Training – Chord Match
 'Chord Match' is the most advanced exercise, however it's also the one with the largest degree of configuration, as you can define exactly which root notes and which chord types are used.
A tip for this exercise is therefore to start out with a restricted set of chords, you can even choose a single root note and work on differentiating between chord types only. As you become more familiar with an initial set, you can then start to add in additional chord types.
As above, you can make use of the on-screen piano (although here you will likely need a MIDI device to successfully play the chords) to match up sounds.
Settings
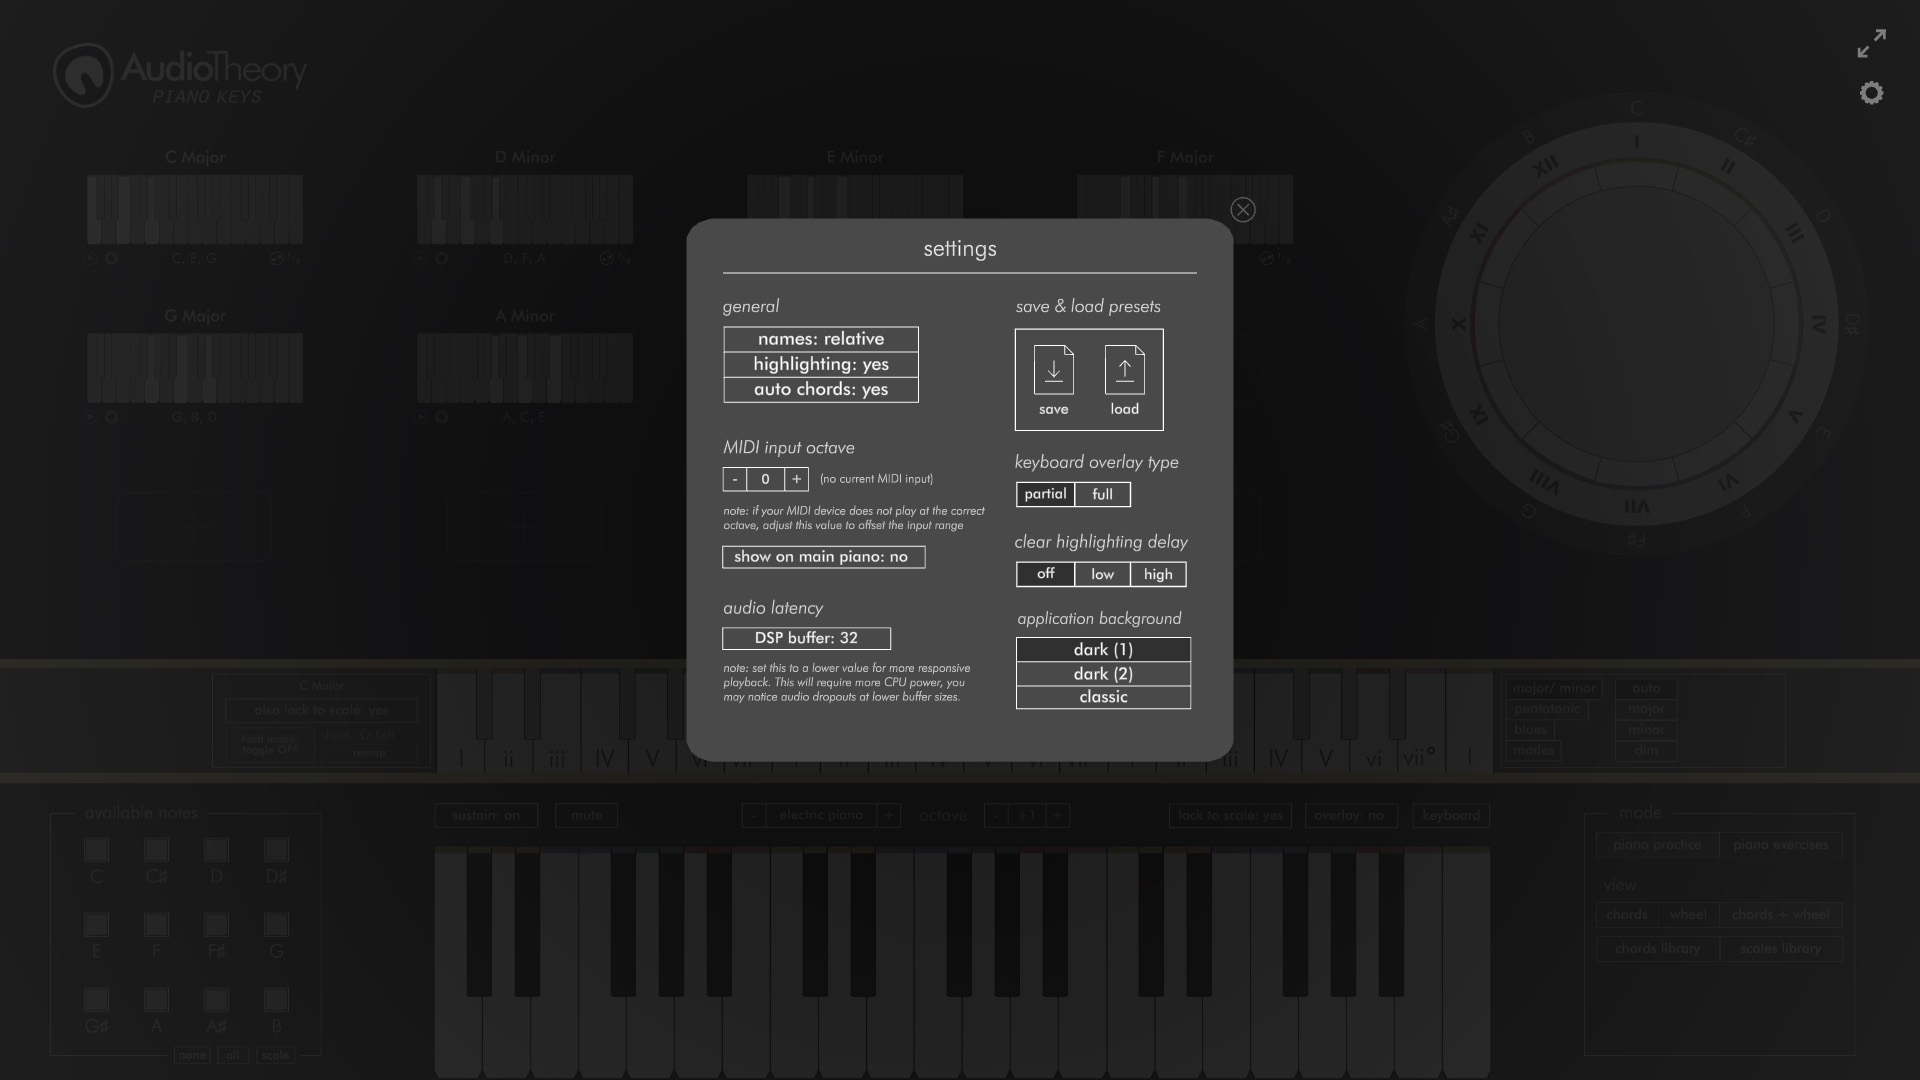 The application settings can be opened using the cog icon in the top left. Here you have numerous configuration settings including some tools for debugging MIDI input, and configuration for various other elements of the application. These include visual customisations, such as different backgrounds and a highlighting delay that keeps note colours on the screen for longer.
Settings – Save and Load Presets
The application settings can be opened using the cog icon in the top left. Here you have numerous configuration settings including some tools for debugging MIDI input, and configuration for various other elements of the application. These include visual customisations, such as different backgrounds and a highlighting delay that keeps note colours on the screen for longer.
Settings – Save and Load Presets
The Save and Load icons found within the settings can be used to write your current view to a plain text file and then load it back into the application. This works well for quickly swapping between arrangements.
Settings – Note Names
As well as the default English note names it is possible to change over the notes to either used fixed do solfège (Do, Re, Mi...) or to use relative names (relative Do or as numerals). Please note that relative names require a scale preset to be loaded (as this is what they will be relative to) and otherwise the notes will not display.
Settings – DSP
The DSP settings control the audio latency of the application, a lower DSP value means less latency (the delay between input and audio output) however this requires more CPU power. This will typically result in audio glitches such as pops and clicks if the DSP is set too low.
Settings – Changing the Application Colours
The note colours can be set using the colour wheel in the settings. It's also possible to modify the hex codes directly in the 'Colours.ini' file that is generated when the application is run for the first time.
The 'Colours.ini' file location varies depending on your platform:
Windows and Linux
{path to app}/AudioTheory Piano Keys/Data/
If you've purchased the app through Steam then you can easily open this folder by right clicking on the application in your Steam library and selecting 'Manage --> Browse Local Files'.
Mac
~Library/Application Support/com.DraculasCave.AudioTheoryPianoKeys/Data/
Please note that in macOS 15+ the file location has changed:
~/Library/Containers/com.DraculasCave.AudioTheoryPianoKeys/Data/Library/Application Support
If you delete the Colours.ini file then next time the application is run it will make a new one automatically with the default values.
Audio Latency – ASIO and DSP
Audio latency is the amount of time it takes for the computer to process and play audio. There are features in AudioTheory Piano Keys which simulate the playback of an instrument in real-time and what this means is that a delay of even a few milliseconds can be noticeable and undesirable.
To optimise response times, AudioTheory Piano Keys comes with some platform-specific options, as Mac/Linux and Windows handle audio differently.
Audio Latency – Mac/Linux DSP Settings
On Mac and Linux the built-in audio drivers are able to support low latencies out-of-the-box. This means you are unlikley to have latency issues with the default settings, however there is still a DSP buffer size that can be configured in the options. A lower DSP value means less latency, however this requires more CPU power. If the DSP is set too low for the computer to handle then this will typically result in audio glitches such as pops and clicks.
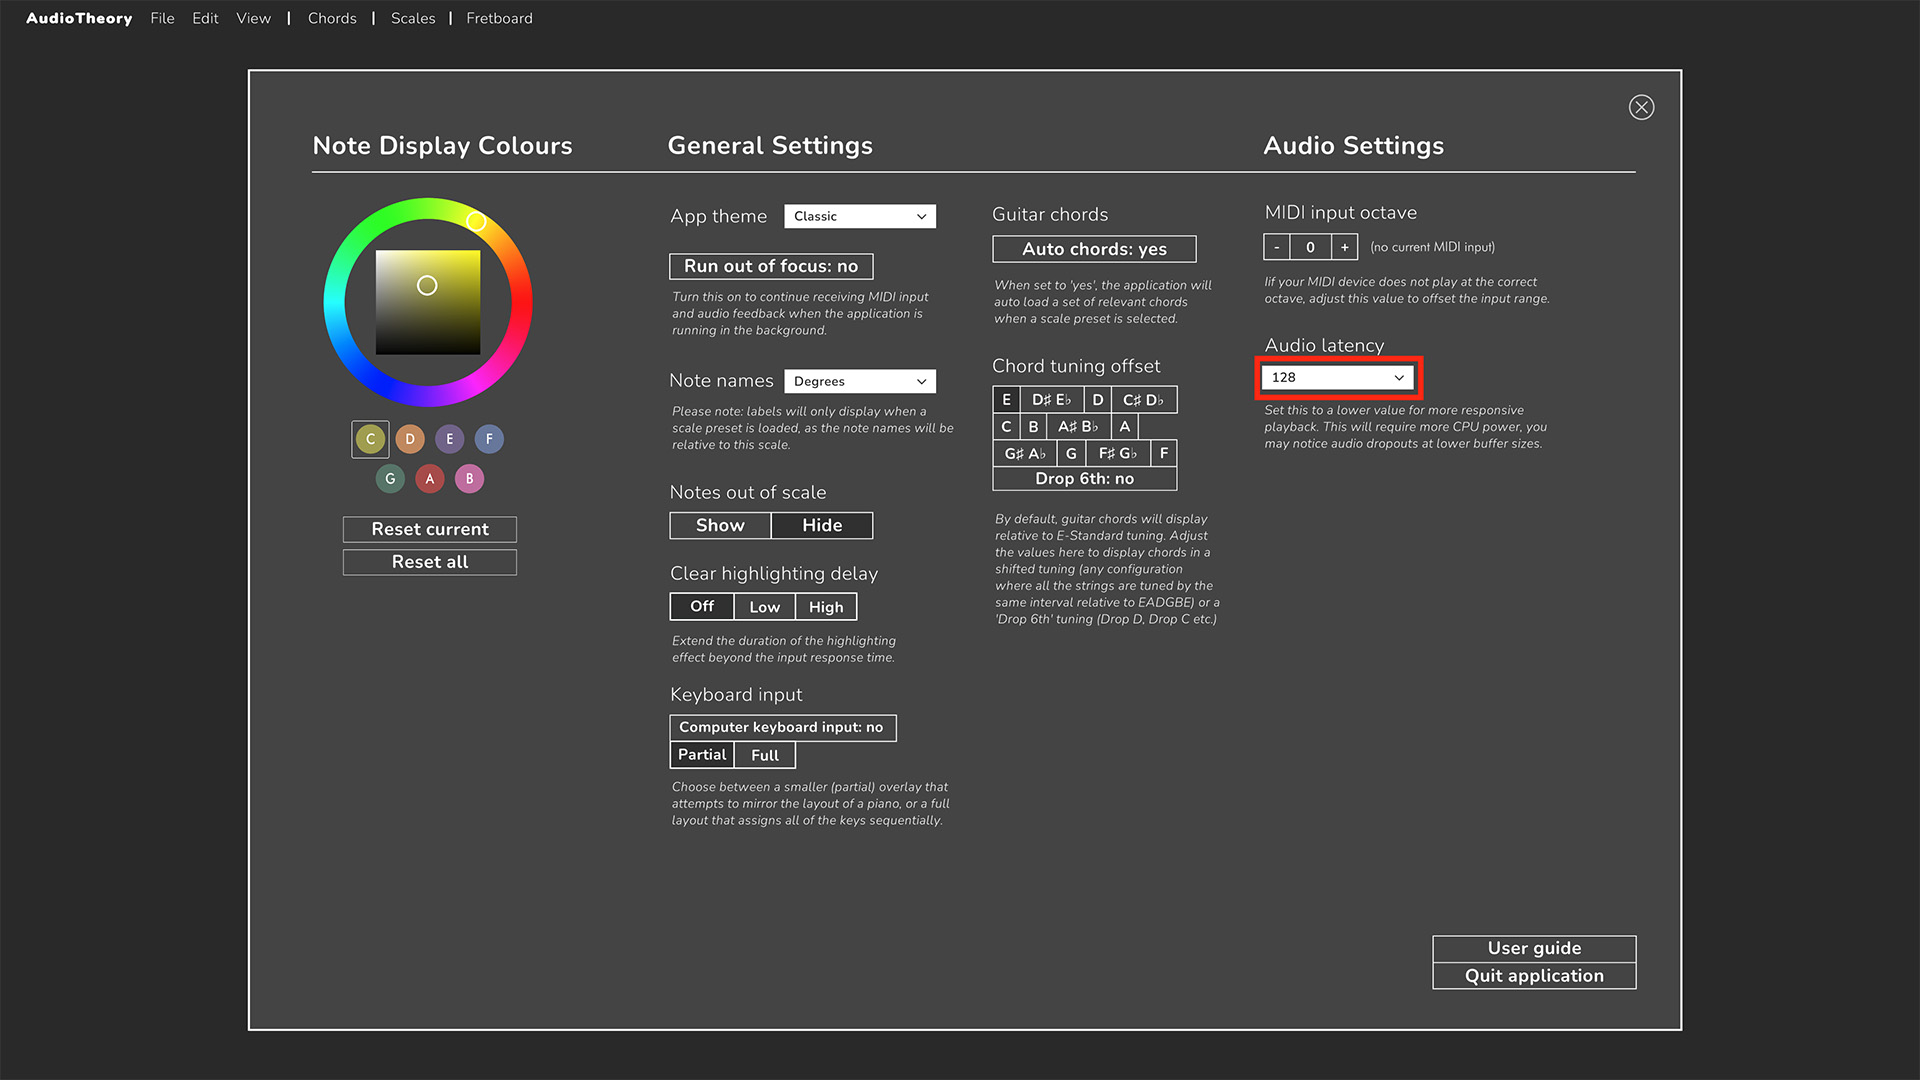
The DSP value can be set using the dropdown in the options.
To get the best results you want to set the buffer to as lower value as possible without audio playback glitching or containing artefacts. For many modern computers you will be able to set this all the way down to the smallest (fastest) value, 32kbps.
Audio Latency – Windows & the ASIO4ALL Driver
On Windows the ASIO4ALL driver can be used to achieve ultra low latencies. Most DAWs require the use of an ASIO driver, and whilst it is optional for AudioTheory Piano Keys, it's recommended for better performance over the built-in Windows driver.
You can download and install this driver for free from the ASIO4ALL website here:
https://www.asio4all.org/
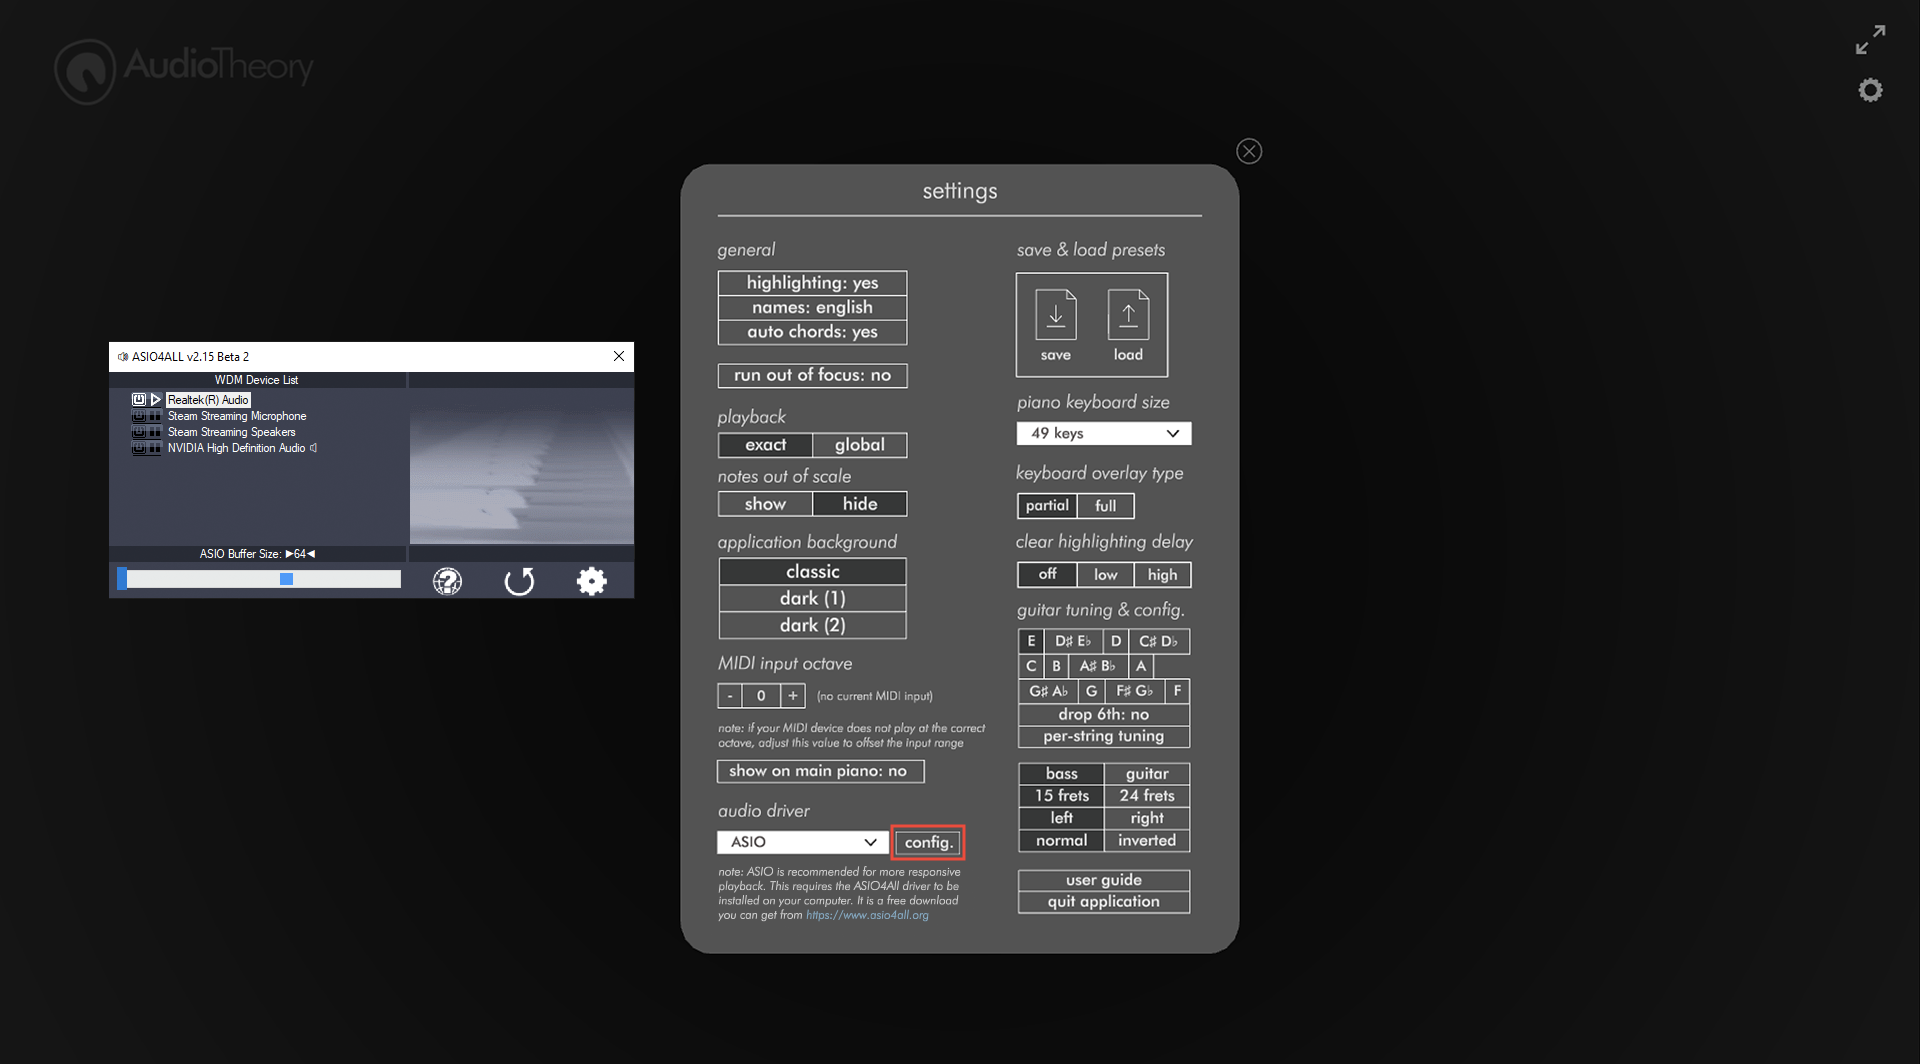
Once it's installed, load up AudioTheory Piano Keys (if it was open prior to the install you will need to close it and open it up again) and you will be able to swap between the ASIO driver and the built-in driver in the application settings. Any changes made here will require the application to be restarted to take effect.
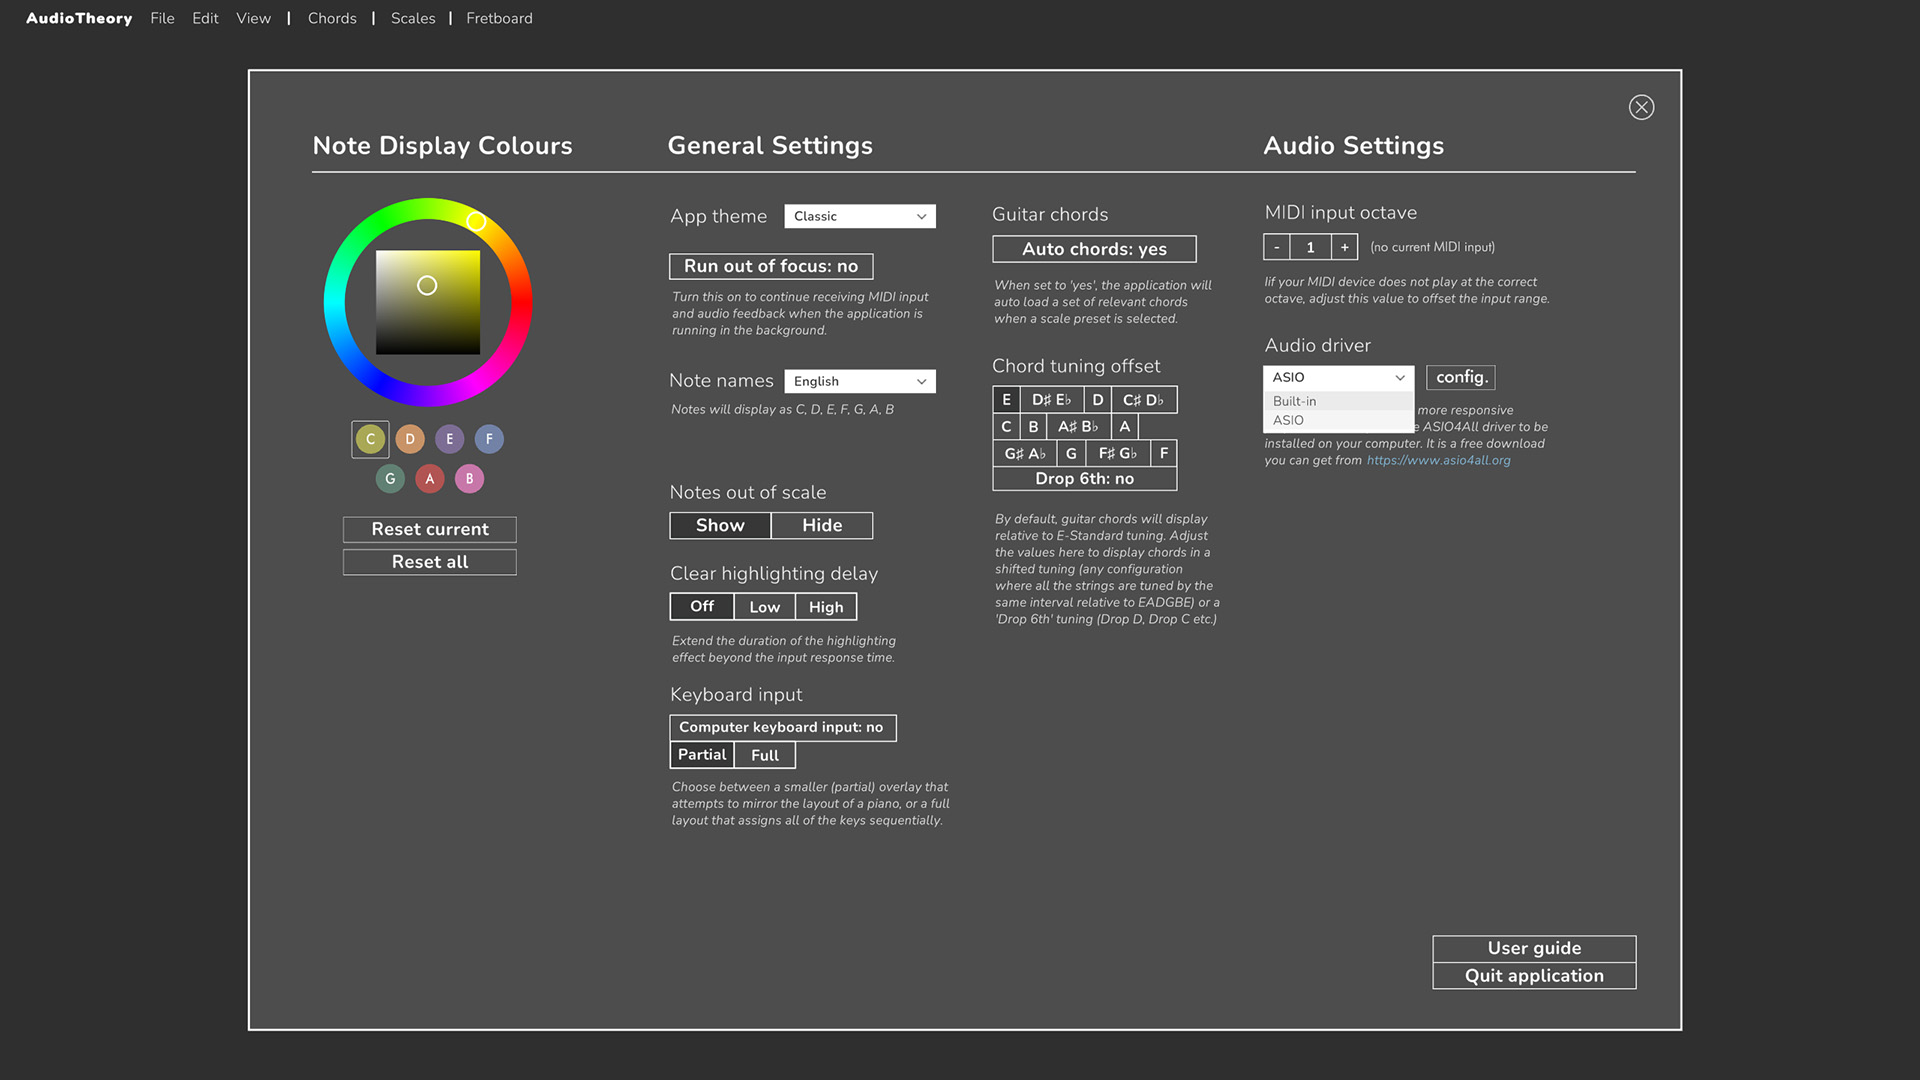
When using the ASIO4ALL driver, there are elements of the configuration (notably the output device and the DSP buffer size) that are controlled in the ASIO4ALL settings, not the AudioTheory Piano Keys settings. These can be opened up by pressing the 'config.' button which appears next to the dropdown when the ASIO driver is in use.
ASIO4ALL requires a dedicated stream for audio output, which means that other applications cannot output audio at the same time when it's in use. You can always swap back to the built-in driver in the settings, and increased latency times may not be an issue depending on how you are using the application.
Input
Playback
Scale Presets
Scale Library
Scale Inspector
Real-Time Scale Highlighting
The Scale Wheel
Piano Chords
Piano Chord Library
Application View
Ear Training Exercises
Ear Training – Higher or Lower
Ear Training – Note Match
Ear Training – Chord Match
Settings
Settings – Save and Load Presets
Settings – Note Names
Settings – Changing the Application Colours
Audio Latency – ASIO and DSP
Audio Latency – Mac/Linux DSP Settings
Audio Latency – Windows & the ASIO4ALL Driver
Getting Started
You can launch AudioTheory Piano Keys from the AudioTheory Piano Keys.exe executable file (Windows) or AudioTheory Piano Keys.app file (Mac OS). This loads up the main interface from where you can access the features detailed in this guide.
Input
The on-screen piano accepts input from any of the following sources:
MIDI – AudioTheory Piano Keys works best when you connect a MIDI device. This could either be an electric piano/ keyboard or MIDI controller. With this connected you will receive highlighting and audio feedback in real time when playing.
You may find that the octave on your device doesn't match that of the application, and the highlighting is shifted to a different position on the on-screen piano. This may be fixed by changing the octave the MIDI device itself, but it's also possible to offset the input value in the application settings.
Mouse – you can highlight/ play any key by clicking on it directly.
Keyboard – there are options within the application settings to use QWERTY input from your computer keyboard to play the notes on the on-screen piano.
There are two QWERTY keyboard overlay types that you can choose between labeled ‘partial’ and ‘full’. The partial keyboard overlay covers a single octave and is split across two rows of the keyboard. In 'full' mode, all the piano keys are sequentially mapped across the keyboard.
There are additional options to customise playback that accompany the on-screen piano when the application is in unlocked mode. This adds in buttons to display or hide the keyboard note overlay as well as a 'lock to scale' feature where only notes selected in the scale will give audio feedback.
There is an octave selector that controls the playback (output) octave. It can be configured independently from the MIDI (input) octave selector in the settings, so you can control how the application receives audio in and how it plays it back separately.
As you play notes on the keyboard you will receive visual and audio highlighting feedback as defined by your settings. This will display across both the on-screen piano and all loaded diagrams, giving you an overview of how what you're playing fits relative to scales and chords.
If you have any issues with MIDI input, there is an indicator in the settings which details exactly what input the application is receiving. This can be used to diagnose any issues you may encounter (e.g. if no notes were highlighting this could be used to asses if the input octave was out of range, or if the device was not properly connected to the computer).
Scale Presets
The note boxes in the bottom left of the screen can be used to exclude specific notes from the keyboard, as well as the chord and wheel diagrams. The 'scale' button provides preset options for using a standard piano scale.
When a scale preset has been selected, the note highlighting updates to be context dependant. For example, if C♯/ D♭ is to be presented as C♯ in the selected scale the highlight colour will be yellow (the colour used for C). But when it's to be displayed as D♭ it will highlight in orange (the colour for D).
There are options to customise this behaviour within the application settings. The default assumptions for sharps and flats can be changed to consistently use the desired accidental, and the rules for note highlighting can be changed too. Whilst the default behaviour is for the black keys to automatically match the natural notes (so C♯ uses the colour for C, D♭ uses the colour for D), it's possible to override this behaviour and set independent colours for the black keys instead.
The 'all scales' button provides a quick link to the full scale library (also accessible from the nav bar). Here you can view sets of scale diagrams side-by-side and choose one to load.
The scale library is where you can view, play-back, and find out more information about different scales. Each scale has it's own play button, with options on the right-hand side of the screne to configure playback settings.
The info 'i' icon next to each scale here opens up the scale inspector. This gives a dedicated view for that specific scale where you can see a larger version of the scale diagram, as well as information about the scale intervals and movable do.
The scale itself can be changed from within the scale inspector too. Press the 'edit' cog to show root note and scale type dropdown selectors.
This is the second row of piano keys that sits just above the on-screen piano. It is one of the application's more advanced features, but once understood it is a very powerful tool for quickly understanding how a note you play fits into two scales at the same time – perfect for improvising.
Scale highlighting is most useful when you are using a scale preset. This is because (as long as 'auto' mode is set on the right hand side) the application will automatically display major or minor scales relevant to the context of the main scale.
The above screenshot illustrates how this works in practice. Here the main scale preset loaded is C Major and the 2nd note in this scale, D, is being played. The 2nd position of a Major scale is associated with a minor chord, which here would be D minor (D, F, A). Therefore it's the minor scale that is relevant to this context.
So when pressing the D note we are able to see the relevant scale for this note, and you will notice that it is highlighted against the C Major scale too (here this means that B♭ is marked up as position VI, but it is greyed out as B♭ is not part of C Major). As such, the notes we are viewing that are not greyed out show the D minor scale progression, but also filtered to our main song key (C Major).
The settings to the left and right of the scale highlighting view offer additional customisations in regard to how this works. On the left you will see the name of the displaying scale and also an option to turn off the dual highlighting filter.
There is also a hold mode, which allows you to keep the 2nd scale displaying even when additional input is received. By default, AudioTheory Piano Keys has its own algorithm for identifying the desired root note when a large amount of input (chords/ multiple notes at once) is received. Typically this will be to display the scale for the lowest input note received, which in most cases will be desirable. For example, if the D Minor chord is played this means that the D Minor scale will always show, regardless of the order (which may be milliseconds apart) between which input is registered for the three notes.
Hold mode gives additional manual control over this, allowing you to press a button on the keyboard and keep the current scale on screen for the duration of the press. By default the hold button is Left Shift, but there is also an option to remap it, and change the behaviour of this button to a toggle (rather than having the requirement for it to be continuously pressed down).
On the right hand side are options to configure the scale type used. As above, the 'auto' option is recommended for use with a scale preset as this will display the major or minor scale relevant to the context. However you can alternatively specify a different scale type (or subsections such pentatonic or blues) to use.
The scale wheel is a new way to view a scale preset. The wheel will display in chromatic mode when no scale is loaded, but once you have a set a preset it will display over the wheel too.
The main use of the scale wheel is that it allows you to see how a scale operates as a set of fixed, relative positions. This is to say that the wheel displays as 12 evenly spaced indicators, where as the piano itself moves unevenly between white and black notes. As such, you have a diagram where you can easily observe how all scales of the same type (major/ minor etc.) use the same set of intervals. The scale wheel also consistently places the root note at the 12 o clock position on the wheel, again this allows the scale to be viewed primarily as a set of 'relative' notes, with the starting point and interval size not changing.
You can see here the difference between the two modes. When no scale is loaded the wheel displays with an empty center, however when the available notes match a scale preset, the details for this scale appear in the middle of the wheel and the notes in the scale are listed underneath too.
The scale wheel works best like this as you have a few extra features, but it can also be used with any custom subsection of notes that don't match a specific preset.
The advantage of using a scale preset is that the application knows which chords within that scale are major, minor or diminished, and indicates this across the relative positions using the following shorthand:
• Uppercase – note in scale plays as a major chord
• Lowercase – note in scale plays as a minor chord
• Lowercase° – note in scale plays as a diminished chord
Note that the application also includes melodic scales that don't imply functional harmony (e.g. jazz, blues etc.). In these cases, the roman numeral indicators are not shown as they are not applicable.
There are a couple more ways in which you can interact with the scale wheel. By clicking and dragging the outer wheel (the dark grey band with the note names) you can quickly swap the scale root note. Upon doing so, this will load the scale fully into the application so the note highlighting will adjust everywhere. You can also click on the scale type to quickly swap between the Major and Minor scales for the current root note.
Piano chords are loaded into the main top left area of the screen. By default, when setting a scale preset that has a corresponding set of chords, these will be loaded too. This can be turned off in the settings if desired. There is space for up to 12 chords so additional chords can be added by pressing the '+' icon on any blank space. Alternatively, each piano chord has a mini-cog 'edit' icon under it. You can press this button to bring up the settings for that individual chord, which includes an option to swap it out.
Each chord has a couple more options that sit just underneath it. The play button can be used to directly play back the chord. There is also a green tick which only shows when the chord is playing, this is useful for playing and verifying chord shapes using a MIDI device.
When hovering the mouse over a chord you will also see an arrow icon, this can be used to drag the chord around and quickly rearrange chords within your view.
The double-arrow icon in the bottom right can be used to cycle the chord up one note at a time. This lets you cycle through the different chord inversions, and transpose the chord up an octave.
The info 'i' icon in the bottom right opens the chord within the chord inspector. This gives a larger view of the chord diagram, as well as information about the chord intervals and chord type. As with the scale inspector, a dedicated edit button allows for the root note and chord type to be changed from within this view too. The chord inspector also includes movable do notes for the chord that update dynamically based on the applied scale preset, and movable do options configured within the application settings.
When swapping out a piano chord you will be taken to the piano chord library, where you can select a new chord to load. In this view, chords are initially sorted by type and you can choose an option using the selector at the top and then view the relative chords for this type below.
There is also a button in the top right that lets you load the full set into the main application view all at once.
Here too, each chord has a play button to hear what it sounds like, as well as an info 'i' icon to open up the chord inspector for that specific chord.
The Window option in the nav dropdown provides options for configuring the application view. Here you can adjust the presentaton of chords and the scale wheel within the main view, jump directly to the chord or scale inspector, or access the built-in ear training exercises.
Found under the 'Window' dropdown in the nav.
Initially when you select the ear training mode you'lll be prompted to start a game using the button. Ahead of this, you can adjust the game configuration using the options in the top-right. During the game, you can swap modes at any time. Any other changes to the settings (including changes to the current scale preset) will take affect from the next round.
When the 'chord match' exercise is selected you will also see a chord type selector on the right hand size of the screen. This will let you choose which chord types will be presented at random for you to identify.
'Higher or Lower' is a good training exercise to start out with as it is the easiest and most straight forward. In this mode you are presented with two notes and must identify if the first is higher or lower (or the same) as the second. This game references the current scale preset, so you can play it with a subsection of the notes if desired. Note that with this game if the number of octaves is increased from 1 to 3 (set in the bottom right) this makes the game easier, as it results in a typically greater (more obvious) differentiation in pitch between the randomly selected notes.
'Note Match' is in many ways a more advanced version of 'H'igher or Lower', but in this exercise you must identify the exact note match. This can be made easier by using a subsection of notes (for example the C Major scale). It can be made harder by swapping setting the number of octaves to use (found in the bottom right) from 1 to 3, as this means a much wider selection of notes are used.
A tip for this exercise is to make use of the main on-screen piano, you can press the notes here to match up the sound before selecting your answer.
'Chord Match' is the most advanced exercise, however it's also the one with the largest degree of configuration, as you can define exactly which root notes and which chord types are used.
A tip for this exercise is therefore to start out with a restricted set of chords, you can even choose a single root note and work on differentiating between chord types only. As you become more familiar with an initial set, you can then start to add in additional chord types.
As above, you can make use of the on-screen piano (although here you will likely need a MIDI device to successfully play the chords) to match up sounds.
The application settings can be opened using the cog icon in the top left. Here you have numerous configuration settings including some tools for debugging MIDI input, and configuration for various other elements of the application. These include visual customisations, such as different backgrounds and a highlighting delay that keeps note colours on the screen for longer.
The Save and Load icons found within the settings can be used to write your current view to a plain text file and then load it back into the application. This works well for quickly swapping between arrangements.
As well as the default English note names it is possible to change over the notes to either used fixed do solfège (Do, Re, Mi...) or to use relative names (relative Do or as numerals). Please note that relative names require a scale preset to be loaded (as this is what they will be relative to) and otherwise the notes will not display.
The DSP settings control the audio latency of the application, a lower DSP value means less latency (the delay between input and audio output) however this requires more CPU power. This will typically result in audio glitches such as pops and clicks if the DSP is set too low.
The note colours can be set using the colour wheel in the settings. It's also possible to modify the hex codes directly in the 'Colours.ini' file that is generated when the application is run for the first time.
The 'Colours.ini' file location varies depending on your platform:
Windows and Linux
{path to app}/AudioTheory Piano Keys/Data/
If you've purchased the app through Steam then you can easily open this folder by right clicking on the application in your Steam library and selecting 'Manage --> Browse Local Files'.
Mac
~Library/Application Support/com.DraculasCave.AudioTheoryPianoKeys/Data/
Please note that in macOS 15+ the file location has changed:
~/Library/Containers/com.DraculasCave.AudioTheoryPianoKeys/Data/Library/Application Support
If you delete the Colours.ini file then next time the application is run it will make a new one automatically with the default values.
Audio latency is the amount of time it takes for the computer to process and play audio. There are features in AudioTheory Piano Keys which simulate the playback of an instrument in real-time and what this means is that a delay of even a few milliseconds can be noticeable and undesirable.
To optimise response times, AudioTheory Piano Keys comes with some platform-specific options, as Mac/Linux and Windows handle audio differently.
On Mac and Linux the built-in audio drivers are able to support low latencies out-of-the-box. This means you are unlikley to have latency issues with the default settings, however there is still a DSP buffer size that can be configured in the options. A lower DSP value means less latency, however this requires more CPU power. If the DSP is set too low for the computer to handle then this will typically result in audio glitches such as pops and clicks.
The DSP value can be set using the dropdown in the options.
To get the best results you want to set the buffer to as lower value as possible without audio playback glitching or containing artefacts. For many modern computers you will be able to set this all the way down to the smallest (fastest) value, 32kbps.
On Windows the ASIO4ALL driver can be used to achieve ultra low latencies. Most DAWs require the use of an ASIO driver, and whilst it is optional for AudioTheory Piano Keys, it's recommended for better performance over the built-in Windows driver.
You can download and install this driver for free from the ASIO4ALL website here:
https://www.asio4all.org/
Once it's installed, load up AudioTheory Piano Keys (if it was open prior to the install you will need to close it and open it up again) and you will be able to swap between the ASIO driver and the built-in driver in the application settings. Any changes made here will require the application to be restarted to take effect.
When using the ASIO4ALL driver, there are elements of the configuration (notably the output device and the DSP buffer size) that are controlled in the ASIO4ALL settings, not the AudioTheory Piano Keys settings. These can be opened up by pressing the 'config.' button which appears next to the dropdown when the ASIO driver is in use.
ASIO4ALL requires a dedicated stream for audio output, which means that other applications cannot output audio at the same time when it's in use. You can always swap back to the built-in driver in the settings, and increased latency times may not be an issue depending on how you are using the application.